Back in June, I was asked to participate in showing a demo at our guild area on rulers. We had four members showing different rulers. Members divided into groups, and shifted tables every 15 minutes. It was a fun program for the members. My demo was on the 60º ruler, which makes a hexagonal table topper. After the demo, I finished sewing the topper, then was wondering what I could do with it. I didn’t need another table topper, and these have not sold well at the shop or Fiber Fair. I thought it was a reader on a blog post (but I couldn’t find it) who said why not use it as the center of a quilt? Well, that is an interesting idea!

The first thing I needed to do was add corner pieces to make it into a rectangular medallion. But, the ends are not squares, so I ended up cutting oversize rectangles and sewing them on.

Lining up the straight side, I cut away the excess from the background piece.

I did this on both sides.

Then, making sure the ruler was straight, and leaving a seam allowance, I cut the excess across the top.

I did the same on the other end.

I added additional background strips to the sides, and top/bottom in different widths so both dimensions ended up with an even number plus 1/2-inch.

Now, what to do? I don’t often design with pencil and graph paper, but this time I did. I couldn’t get EQ8 to understand and this was just faster. The only thing I knew at this point was I didn’t want any stars. Pinwheels sounded good, so I slotted those in. Then, I thought about putting just a few flying geese in the final border. In a fit of ambition, I thought, why not put flying geese all the way around? I have been looking for more complex designs. This is it!

I started making half square triangle blocks from the black bee print fabric and the white background. These are 4-1/2-inches, making the pinwheels 8-1/2-inches.
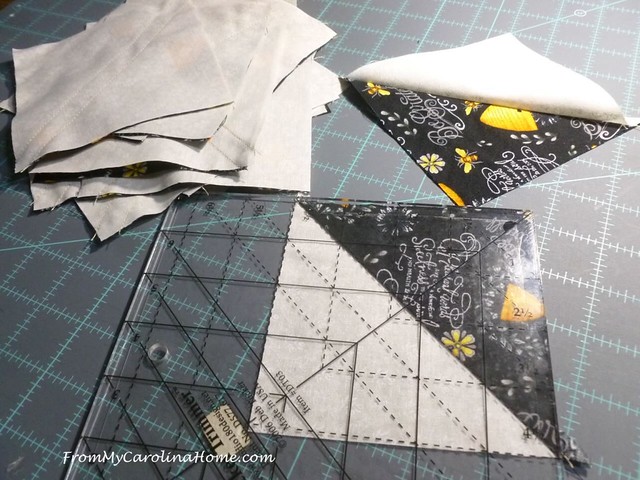
Assembling the pinwheels
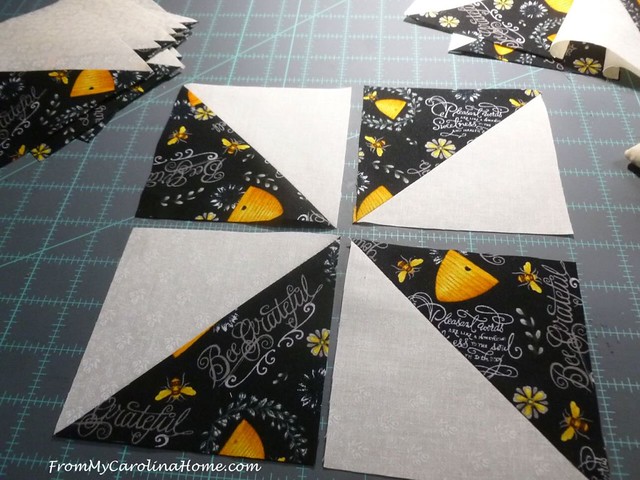
Pressing well, I spin the seams to reduce bulk.

I started laying them out, to be sure I knew how many I would need. Ultimately, I made ten pinwheels. The background fabric between the pinwheels had to be calculated as I went, as the sides were different than the top and bottom.

Eventually, I assembled the next section round robin style.

OK, let’s start making flying geese! For some reason, unfathomable, I calculated that I would need 160 of them. I cut the white squares to do the no-waste method. I took these to the den, and marked lines while watching TV.

I did these in batches, so I could vary what I was sewing instead of doing the same step across all of them at once. I pinned a bunch at one time, then sewed those. There are several bee prints with backgrounds in yellow and grey.

Chain piece all those, and then chain piece the second square on.

Cut apart and then square them up. I like using the Deb Tucker Triangle Trimmer for this.

Ok, there’s four. Only 156 to go.

Yes, I think for a time I had completely lost my marbles. But, I kept going. More on this next time!


I love your thought process description. It’s like reading a novel. Can’t wait to see the finished quilt.
It’s looking good. You’re very creative! Looking forward to seeing the finished top.
What a perfect use of a sample!
I love that you turned this into the center of a quilt and look forward to seeing how it evolved!
Our guild had a demo on multiple rulers. I too like the Deb Tucker trimmer rulers as the units come out accurately.
Looking forward to the next installment.
What a great idea to make your hexagon the center of a quilt and working it out as you go. I have a leftover hexagon topper I was wondering what to do with. I’m going to try your idea.
I wonder what were the other rulers that were demonstrated. That is also a great idea for a quilt guild activity that I’d like to do in my guild.
Thank you! I hope your quilt comes out nice.
On our ruler demo program, we had four stations – one with the 60-degree ruler, one with Deb Tucker Wing Clipper, one with Deb Tucker Trimmer, and one with with a Dresden Plate wedge ruler.
Thanks so much for your quick reply. My guild has a stations demo activity every year in the winter and I am definitely going to put the rulers demo on our calendar.
Is that the Wing Clipper? Thats my favorite tool for trimming geese!
Yes, it is!
Carole, love it so far. Great use of a previous project. On the last quilt i made. I was so pleased that I got my pinwheels to look great using the spin method. I’m finally getting the hang of it. Looking forward to your next steps.
Niki
Clever idea! I love how this is looking. Can’t wait to see the progress. It looks like a beautiful start!
You have the best collection of bee-themed fabric, Carole! I love seeing how you’re using them to add on to the tabletopper-sized piece you started with. The pinwheels are really pretty dancing around the center. I’ll enjoy seeing how you finish this design!
That’s the most fun way to make a quilt! Eagerly anticipating the next installment.
I can’t wait to see the finished project.
What a clever idea! I cannot wait to see the finished product!
I am a Wing Clipper fan also! I was on a shop hop when one of the shops gave a demo using it. The Wing Clipper at that time was brand-spanking new! I haven’t looked back when it comes to flying geese. Perfect ones every time!! Your Bee Quilt is coming along nicely. Love all the bee fabrics!
What a clever way to use your topper. I tend to avoid medallions because there is too much “quilt math”, and it makes my head hurt! LOL. This is really coming out nicely.
loving the center, but my little brain is confused… the center not a circle!?
6×6 is 36 (360 degrees… a circle) yet yours looks wider on the bottom and top sides! im liking this look!
No, the center is not a circle. It is made with long sides and the 60-degree ruler. See the construction of the medallion part on my post In the Sewing Room from July.
wow..ok. stepping outside the box (triangle?) !!!! obviously i need to play with blocks a bit more and get the creative outlooks going. the old standard can be upgraded so nicely! thanks for the inspiration
That’s going to be such a pretty quilt!