
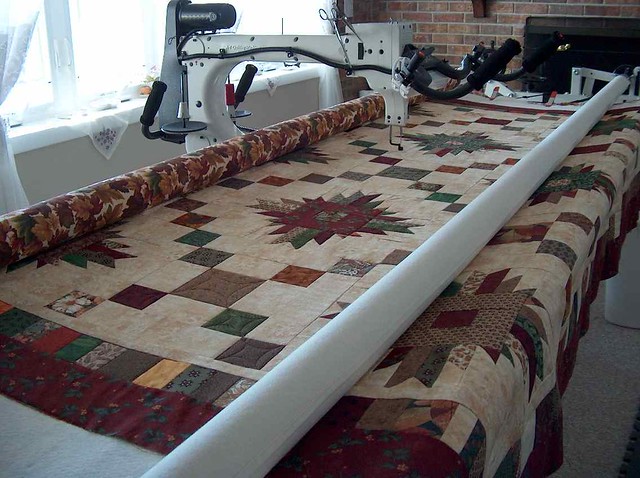
This tutorial will take you through how to prepare your quilt to be quilted by a longarm quilter. You’ll learn not only what to do, but why it is important. Many quilters like having their quilt tops professionally quilted. By paying attention to a few details, this experience can be very rewarding. There are a few tips to make your quilt top easier to work with for the longarm quilter. Some of these tips might even save you money if the longarm quilter doesn’t have to stop and make adjustments or corrections to your work.
Download a 3-page pdf of these guidelines by clicking Preparing For Longarm Quilting
Download a 1-page bullet point pdf by clicking Preparing For Longarm Quilting Bullets
An accurate 1/4-inch seam allowance is important. The long-arm quilting machine pulls the fabric taut and stretches it. If the seams are not strong and accurate, the longarm rollers stretching the fabric sometimes can pull the seams apart. Use 1/2-inch seam allowance for backings and press the seams open to distribute the extra fabric fullness along the seam. You should also check your quilt for seam breaks. If at all possible, place your backing seams so that they run parallel to the way the quilt will be loaded on the rollers. For custom quilts, this usually means running along the long axis of the quilt. For pantographs, it will depend on the direction of the design.

Make the quilt fit the borders, instead of the borders fitting the quilt. Click on this Quilt Border Tutorial for an explanation of how to do this with pictures. By the time you finish your quilt top, the edge will usually have stretched somewhat, especially if there are any bias pieces on the edge. If you measure the edge to get the measurement for your border, you will almost always end up with a quilt that will not hang straight or lay flat. This is a common problem with blocks set on point due to the bias edges. To avoid this, lay quilt top on a large surface or on the floor and measure your quilt in three places through the center of your top, average these numbers and cut the borders this length. If there is more than 1/2” difference, square the top again. Fold the border and mark the middle. Fold it again and mark the quarter points, then once more and mark the eighths. Mark the quilt edge in eighths. Pin the border to the middle of the quilt. Next, pin each end. Match pins at the fourths and eighths and ease the quilt to fit borders. Finally, pin the rest of the border, making sure the fabric is spread evenly. Don’t forget to “stay-stitch” the edge as soon as you’re done attaching the borders. This will prevent any stretching from further handling.
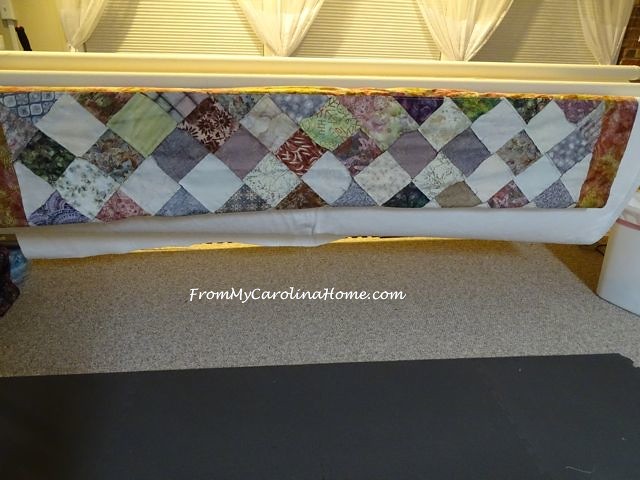
Here’s an easy way to check if your borders are put on correctly. lay the quilt on the bed or a table with the top border right at the edge and the rest of the quilt hanging off the bed/table. Then bring the bottom border up to match the top. Now check the fold line at the middle of the quilt hanging down. It should not bow up in the middle, if it does, then the borders are too long. This quilt’s borders are way too long, and should be removed and remeasured.
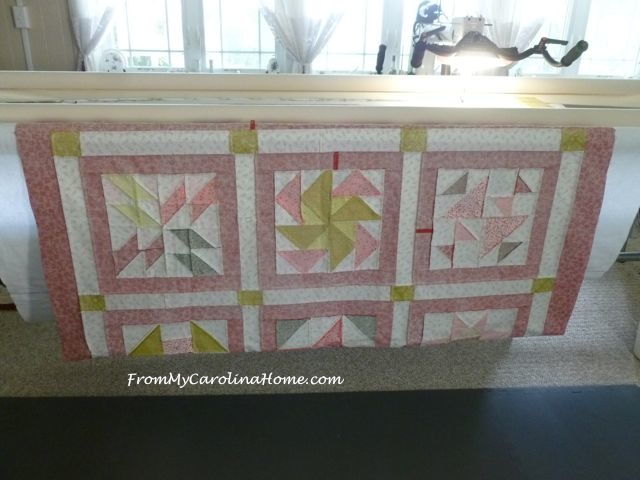
This one is perfect, see how the fold line is absolutely straight horizontally?
Hint for scalloped edges: Don’t cut the scallops until the quilt is quilted. Mark the cutting line clearly so the quilter knows where to quilt, but don’t cut it until you are ready to apply the binding.
The batting and backing need to be about 4 inches larger than your top on all sides. This means a total of 8″ extra in length and in width. This will allow enough room to pin it on the rollers and attach side clamps. Did you know that a pieced top will stretch more than an unpieced backing? So, just in case the top stretches the larger backing will be able to absorb the difference. The top is sometimes floated over the backing, meaning that it is only laid on top of the sandwich and not attached to the rollers. Do not baste your quilt sandwich, bring as 3 separate items – top, batting & backing. These are loaded onto the frame as separate pieces.

The quilt top and backing should be clipped of loose threads, both front and back that could cause snags and uneven stitching. The longarm foot can catch in loose threads on the top and break the quilting thread or cause a wave or wobble in the stitching. Loose threads can also get into the wheels and encoders causing skipped stitches, and sometimes even fabric tears. Thread breakage is the most common problem with quilting. Reduce that as much as you can by using quality fabric backings and battings. Your top was done with a lot of care and time so don’t skimp on the other components. Thread breakage produces more stops and starts in the quilting.
The quilt backing and batting should be squared. Quilting does not correct piecing problems. If the quilt is not square, has fullness through the center, or has wavy borders you may end up with pleats quilted in to try and flatten your work. Both top and backing should be carefully pressed. If you can’t press it flat, the quilter can’t quilt it flat without a lot of extra work and maybe putting in some tucks or pleats. Longarm quilters hate hearing ‘you can quilt that out’. If your quilt has C or D cups in the middle, fix them by redoing the piecing. Lay the top out on the floor and check it for waviness.
Tell the longarm quilter what the quilt will be used for. This is important when decisions are made that affect the way it is quilted if there are problems. A common question comes up when a quilt isn’t square and/or has fullness in the center or the borders. The longarm quilter will have to decide if it is better to quilt it flat and thus it won’t be square, or quilt it square trying to ease in the fullness by extra quilting or pleats. Knowing the final use of the quilt will assist in that decision. Even better is to discuss it before the quilting begins and decide if you would rather have it flat or square if a choice is needed. Longarm quilters love beautifully pieced tops that are both flat and square, so do your best to deliver a top that is both.
If you have pieced borders or pieced blocks up to the edges of your quilt you must stabilize the edges with stay stitching l/8” to l/4” from the edge prior to quilting. The backing and top are put on rollers and there will be some tension applied. If you do not stabilize the edge, you run the risk of the seam pulling apart during the quilting process. Backing seams should be at least 1/2-inch and pressed open. If you don’t stabilize the edges, the quilter may need to do that for you, resulting in an extra charge. Know that borders cut from the cross grain will stretch more than borders cut from the straight of grain.

The quilt top should be free of embellishments, such as buttons, charms, pins, etc. Be sure you have removed ALL the pins. Check again! Pins can break a needle and throw a machine out of timing, which won’t endear you to the quilter and may result in you being charged more. If you plan to have appliqués, it is better to have the top quilted prior to attaching the appliqués. Quilting around appliqués makes the process more difficult, and thus more expensive.
Remove all selvedge edges on backing seams and make sure it is square. The ideal backing seam is at least 1/2-inch or more to provide stability against popping open as the backing is stressed more during quilting. Press seam open to reduce bulk. Selvedge edges do not stretch the same as the body of the fabric. Selvedge edges left on seams may cause unevenness in the top or backing as it is stretched on the frame and result in puckers that will get worse when the quilt is washed. Understand that backings with lots of seams may end up with pleats or tucks on the back due to the uneven stretching on the frame. Backing edges should be straight to allow loading on the leaders of the frame.
When choosing the fabric for your backing think of the color thread that will be used in quilting the top. If you want the quilting on the backing to be subtle then choose a color or print that will blend with the color of the top thread. However, if you want the quilting to stand out on the back then choose a fabric that will contrast with the thread color. Busy fabrics help hide a lot of starts and stops and are better for most quilts.
If you want different colors in different areas of the quilt, be sure to discuss how you want the back handled as to thread color. Most longarm quilters prefer to use the same color on the top and bobbin to minimize the “pokies” that sometimes show. If a color change on the back is going to bother you, be sure you discuss it. Or choose a single color thread for the top.
Indicate the top of the pieced top and the backing on the right side so any seam(s) on the back or directional backing will be oriented the way you wish in relation to the pieced top of the quilt. Use a safety pin to pin a little scrap of paper on the top edge of both pieces that says “top”.
Choosing the batting is often confusing and can be frustrating for the quilter. Most quilters use cotton, but there are many choices available including polyester, wool, silk, corn or bamboo. Different lofts are available too. Some longarm machines just perform better with one brand over another. If your longarm quilter offers batting for sale, it is often the best way to go, as you are sure the batting will work well with their machine. But, if you have a full or wonky quilt top, choosing one with higher loft will make it easier to take up extra fullness. If you choose to buy your own batting, be sure you know how to care for it after it is quilted. Some battings like silk and corn cannot be put into a dryer.
When choosing the quilting design for your quilt, if it is important to you, be very specific as to what you want. Don’t assume the quilter will know what is in your head. If you say you want it quilted to the edges, you will get exactly that. If you really meant that you wanted it quilted up to where the binding will be, make that clear. This is more important with custom quilts for show than it is for pantographs for heavy use, but it may affect how you feel about the quilting. On the other hand, if you want something truly amazing and beautiful, let the longarm quilter do a custom job using what he/she thinks will look the best for your piecing design. Often, the quilter has much more experience in quilting design and placement, and your final product will be gorgeous.
Timing of the completed project sometimes can be a problem. If you need to have the quilt done by a certain date (for a wedding, graduation, etc), give the quilter plenty of time to do the job you want. Be sure to give yourself time ahead of the expected delivery date to apply the binding. Trust the delivery date promised, and don’t call the quilter to “see how it is going”. Then, pick up your quilt promptly when the quilter calls to tell you it is done.
Longarm quilters want you to be happy with their work. Communication goes a long way to help you and the quilter choose the best ideas and give you the best results.
Please feel free to link to this article, but do not copy any part of it without permission.
Copyright Carole Carter, From My Carolina Home, 2014, All Rights Reserved.
My blog is a variety of subjects, quilting and sewing, tablescapes and recipes, book reviews and hand stitching, crafting and mountain living. I love to have new followers, too! See the buttons on the sidebar to follow by your favorite method. If you are visiting from Fave Quilts, All Free Sewing, Pinterest, a link up site, referral from a quilt shop or longarmer, or just found me, please stay a bit and have a look around, my tutorials are gathered at the top in pages to make them easy to find. Lots of fun is had here, and I invite you to follow with any of your favorite methods, see the sidebar for ways to follow. Click on the Home page to see the latest posts on the blog.

Great advice. I have been quilting since ’07 and I am now over 30+ ; 27 of which have been long-arm quilted. Enjoy the blog and information.
My backing is only 1-2 inches bigger on each side than the top because I was going to quilt it myself. But! I tried it to find it too difficult for me right now. So to the long arm quilter it goes.
If I sew on additional fabric to make the backing 4 inches larger on all sides will the seam be a problem if too close to edge of pieced top?
Add a full four inches all around so the longarmer can clamp without hitting a seam. This will help the longarmer to keep the top inside the seams.
Great longarm advice.I have had problems quilting wavy borders. Will definitely benefit from your advice.
Wow, I had no idea how much work is is to prepare a quilt for a longarm quilter. I have quilted all of my own quilts on my domestic machine but have a king size quilt I will need to send out. Have to admit that all of these points is making me nervous. Great advice, though!
I was taught to baste the edges (top, side and bottom) first on my quilt frame, then quilt all the borders at one time. However this technique causes excess fabric when I get to the bottom of the body of the quilt. It is completely wrinkle free when I do the borders, but for some reason the fabric stretches out by the time I am at the end of quilting. Sometimes there is so much excess fabric that it is impossible to ease the fabric to be smooth. The borders are already quilted so I can’t smooth the quilt out. What order should I be quilting? Should I start in the middle and work my way out – that is opposite of what I was taught. Thanks for any info.
I usually quilt from top to bottom, but doing the borders first shouldn’t be a problem if the borders are applied properly. It sounds to me like the borders are too big, and quilting them first transfers the excess fabric to the center of the quilt. If you straighten the sides, and square the top and bottom borders, that creates wrinkles in body of the quilt, which you are pushing to the bottom as you quilt the center. The correction should be in the application of the borders, see my tutorial on borders to understand how this happens.
Hi there, I am a newbie at quilting on a long arm frame and have had some issues and would like to ask you some questions if possible?? I’m having issues with getting my hopping foot over seams smoothly (?due to the bulk??) and I have been frustrated in general and not happy with my results. Is it essential to “baste” the quilt edges prior to quilting? I ask because I find that I have excess/fullness when I get toward the middle. Any advice or suggestions are welcome.
Thanks, Shannon
Sent you an email. For your own quilts, try ‘spinning’ your joining seams. I have more tutorials gathered at the top of the blog for loading a longarm and fixing problems I encounter – see Fixing Quilt Problems, and Quilting Basics Tutorials.
Hi Carole, I sincerely appreciate your words of wisdom. In my late 60’s I now have the privilege of owning my own long arm. As I begin this new adventure, I must admit I owe blessings and homage to the long arm quilters in my past who have faithfully and patiently quilted my less than perfect quilted efforts. In my youth I was just so happy to have finished a project. Now I know the value of measure, sew, iron – repeat. Thanks for your insightful comments. I will take these to heart as I continue to navigate toward a more perfect project. Joyfully!!
Alexis
I am trying to quilt my 1st custom quilt with ruler work and would like to know if floating the quilt is a better option? Just not sure what to do first after loading quilt, do I baste around each section as I get to it, not sure how to quilt each section before doing ruler work if it’s not reachable at the time?
would appreciate any help possible have not been able to find any answers so worried of messing quilt up and of course it’s suppose to be Christmas gift.
Just found this information that you shared and it is so helpful. I’m a newer longarmer and have found this problem on the last quilt I worked on. Would love to have any suggestions foe future reference. I longarmed a pieces quilt that had one of the fabrics which seemed to ravel easily. When I prepared to do a pass no stay threads were noticeable though one of the cream fabrics however when I finished my pass many of the threads could be seen. I did multiple trimmings of the underside of the quilt both before ans a few times during the quilting process. I even took the top off and trimmed before doing another pass. What could I have done differently and is there anything I can do to change what I’ve already done (besides taking all the longarm rows out a s redo)
Thanks for any help you can send my way