
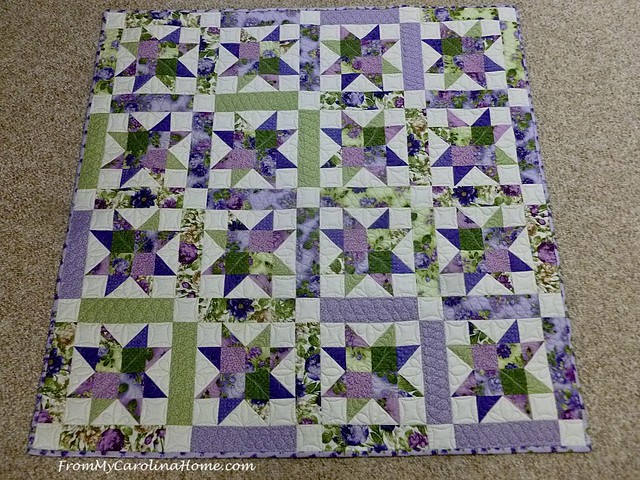
Did you get all your blocks done and your top assembled? Today, I’ll show you how I custom quilted mine. This project is small enough to do some wonderful free motion quilting on your domestic machine or your longarm. The challenge with this one is to step outside your comfort zone and try something new. Try curves instead of just straight lines. Use your free motion settings and try some motifs or feathers. Don’t worry that it isn’t perfect, mine certainly is not. The idea is to face your fear of more detailed quilting, challenge yourself and just go for it.

I loaded mine on the longarm, and decided to do a free motion custom that I do not do much. I need the practice.

I auditioned thread colors, and decided on the light sage green. I have matching sage green in Bottom Line for the bobbin. The top thread is Magnifico, a polyester thread.

I began with marking some lines for a curved quilting design called ribbon candy. I used chalk that removes with just brushing.

Then I quilted that first section, and oh crap on a cracker. I did it wrong. I didn’t leave the margin on the edge for the binding.

No, I’m not going to take it out. But I did mark the margin on the next strip.

Then I kept going across the top strip.

Next I worked out a thread path to get the left sashing and the star in one long line without stopping to tie off. On the top sashing line, I did the ribbon candy, the stitch in the ditch on the white cornerstones and the curves in the cornerstones in one pass, moving to the next sashing strip in one long stitching line. Then, I began with the top right corner of the purple sashing strip in this photo, stitching a ribbon candy to the bottom left edge, then stitching in the ditch between the purple and the white ending at this corner.

From here, I stitched in the ditch across the white corner patch.

The curves inside the square will bring me back to the same point, so I do that next.

From this point, I stitch in the ditch to halfway across the white triangle.

Quilt a little motif of three petals.

Then, I stitch in the ditch across the rest of the bottom on that block, and up the side of the white corner patch. You could stop at any corner of this patch to do your curves.

Quilt the curves on all sides, bringing the stitching back to the same point.

Repeat the steps, going halfway across the white triangle, stitching the petals, continuing around the edge to the square, quilting the curves and moving on until you get to the one you started with. The seam line on the left of this square isn’t stitched, so stitch in the ditch on it, and return back to this point. Yes, you are stitching this bit twice, but it is OK. Now you are doing to stitch in the ditch all the way around the star.

Using a ruler will help keep the lines straight.

Go all the way around the star, coming back to the same point.

Now, stitch in the ditch over to the inside corner of the white square, and then do a curvy line to the very center of the block.

I put feather fronds in the star points. I use that stitched line as my first one. The next set of star points I did with just an imaginary line, connecting the fronds together as I went. Each time I came back to the center. When all four were done, I tied off the thread.

Continue down the row of stars in this way. For the next row of sashing, begin with a ribbon candy in the color sashing, ending at the top point. As the top of the square has already been stitched on the previous row, travel down the white square, across the bottom and up the right side. Then, do the curves in the white square, coming back to the same point. Note that I am marking with chalk as I go to keep my ribbons even. Go forward with ribbon candy in the next sashing. Repeat until the row is done.

When you get to the bottom, don’t forget to leave that allowance for your binding when you mark.

Before you know it, it is done!

Overall, it is OK, I do need practice for freehand shapes.

I stitched the binding to the front, then turned it to the back by hand while watching some XFL football, and Formula 1 racing.

All done!!
If you are just now finding this free pattern quilt along, see the previous posts for step by step tutorials on all the techniques used.
Oh, My Strippy Stars!! Quilt Along Schedule – March 2023
March 1 – Overview
March 7 – Four patch units
March 14 – Jelly Roll HST units
March 21 – Block assembly, quilt assembly and sashing
March 28 – Quilting and finishing – today!
This pattern is a gift to readers for National Quilting Day. It will remain on the blog for you to refer back to as needed. The pattern contains all the steps to make the quilt, just not as detailed as the tutorials. If you are just finding this, click on this link for the pattern – Oh, My Strippy Stars! Share your progress in our Facebook group Friends of From My Carolina Home. If you are not already a member, be sure to scroll down on the Join application and answer all the questions to be approved by the moderators.

Now, the challenge! For those in our Facebook Friends group, post a photo of your completed top with some free motion quilting and you may win a prize! I’m putting together some goodies left from previous vendor promotions and will have an announcement on the group soon. You’ll have until May 1 to post!
I hope you enjoyed it! Happy Quilting!

Beautiful quilting, Carole. I especially love the feather fronds in the stars – might copy that on mine! Wasn’t it fun to do your own free-hand FMQ? I forget about the outside margin all the time so it looks like the motif is peeking in.
Lovely! Thanks for sharing all the close up quilting details. Fabulous!
Beautiful and inspiring quilting!
It looks beautiful. The colors and the quilting look so nice.
This is a beauty, Carole! Well done!
Fantastic step by step instructions of how to move around the quilt for a custom quilting job!
Fabulous quilt and quilt along! I will be sewing on mine next week, and hope to have a top after the retreat. This is a very generous gift to your followers.
I love how it turned out, Carole. Your instructions are great. Thank you.
What a beautiful finish, Carole!!
Your quilt is stunning.!
Beautifully done! I love the close up look at the quilting! I have saved the pattern for when I have time and am not swamped w/ hrs at the hospital! Thank you!
BEAUTIFUL creative quilting my friend!