
Last year, I did a post on Care of Your Older Sewing Machine, where I took apart several machines and went through how to clean and oil them yourself to save money. Older machines, out of warranty, are easy to clean and this usually solves most stitch problems too. A small stray thread can create all kinds of problems! I finally got the Pfaff problem solved, so here is that tutorial. Unplug the machine before you start.
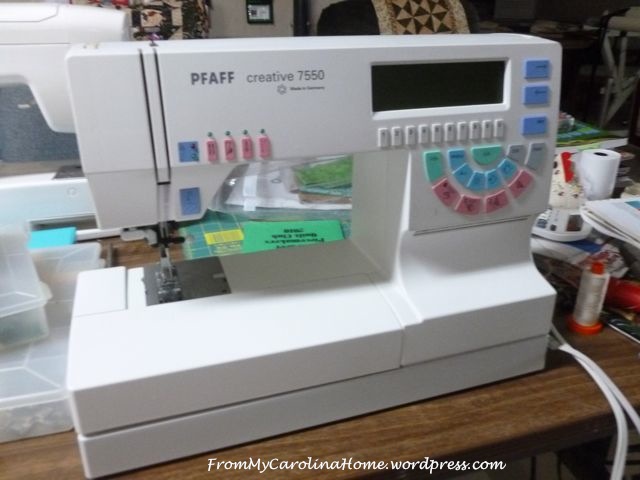
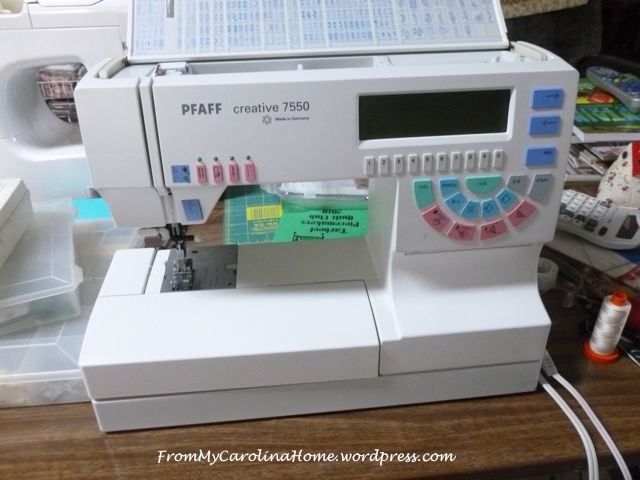
One thing that stymied me last year was getting the cover off my Pfaff 7550, which was running rough and skipping stitches. I knew there had to be some trick to it, but I didn’t know what that was. Thanks to Karen, a fellow Pfaff owner who recently came across the other article and emailed me, I now figured out all the steps to getting the covers off. Karen said ‘after you flip up the lid and remove it…”, ah what? That was the part I was stymied by! The screws were obvious, but the cover wouldn’t budge with the flip lid in place.
The clips seem to indicate that you move the flip lid towards the front of the machine but that didn’t work. I didn’t want to break the lid, so I left it.
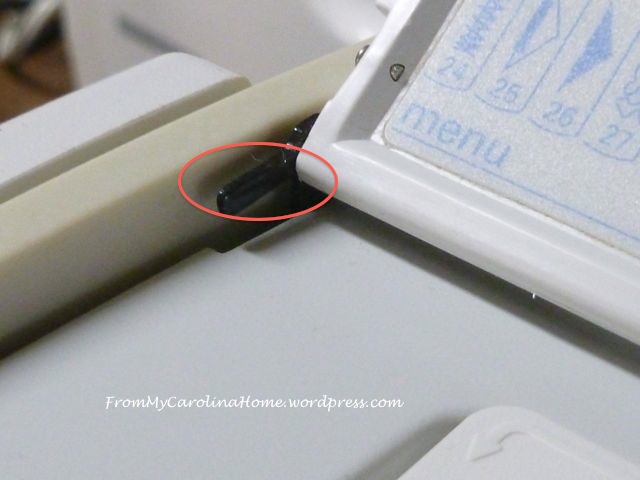
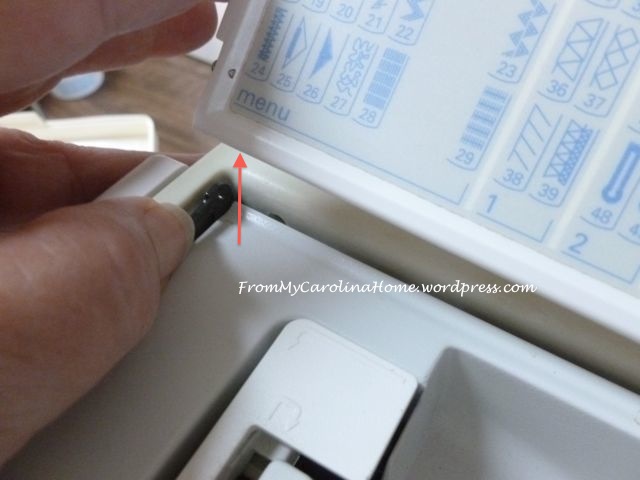
No amount of searching told me how to remove that flip lid. But if Karen went by it that fast, it must be something reasonably easy. So I went back to it again, with a little more daring. I looked again, tried this and it worked. Push the clip towards the left with your thumb, and the little pin will disengage.

Then lift the lid off.
Move the bobbin winder to the right.
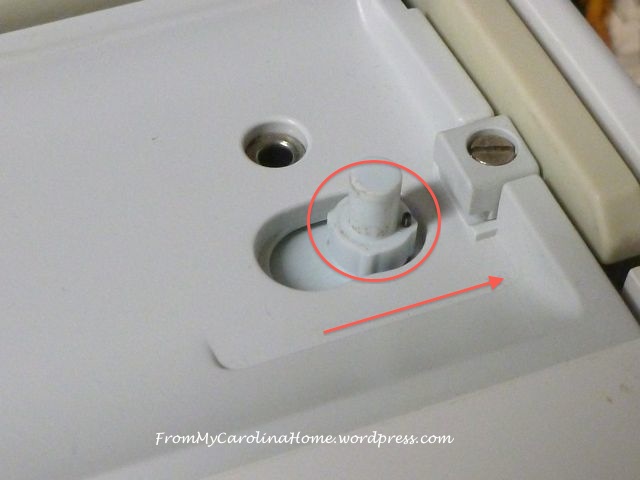
Remove the two screws. Do not remove the screw holding the bobbin check in place, it isn’t necessary and is a pain to get back in the right place. See below if you did this accidentally.
Raise the handle.

Lift off the under cover.

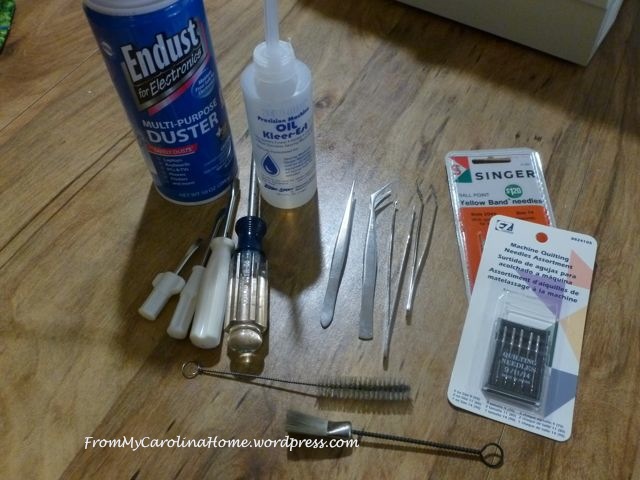
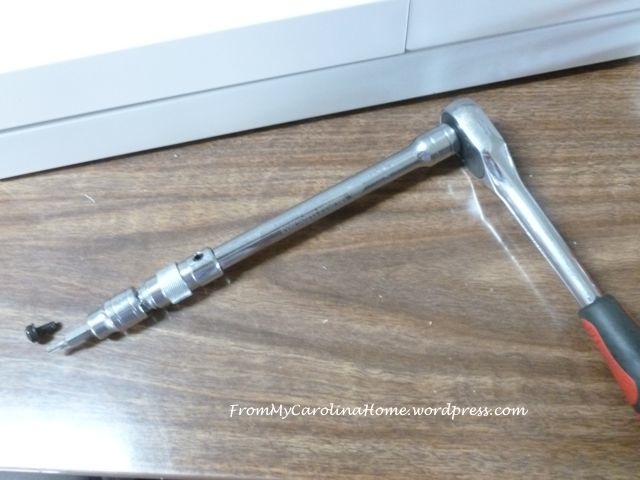
Here are my tools for servicing a sewing machine. Several screwdrivers, three flat and one Phillips head, a tiny bottle brush, a nylon stiff bristle brush, several kinds of tweezers, canned air, sewing machine oil. and (not pictured) blue gear grease. New needles are good too.
Now, remove the needle and the presser foot. Raise the presser bar.
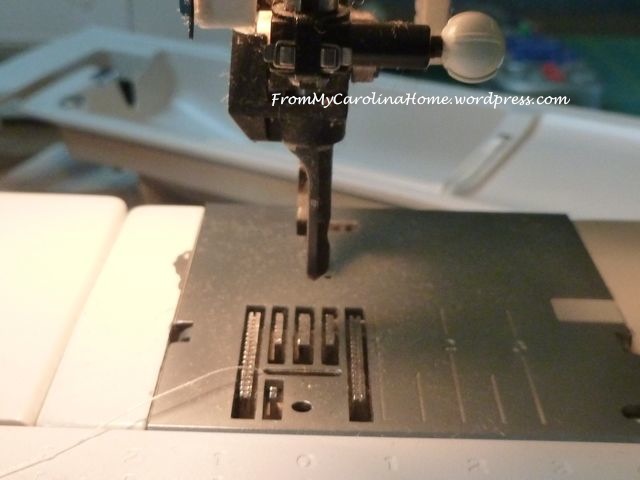
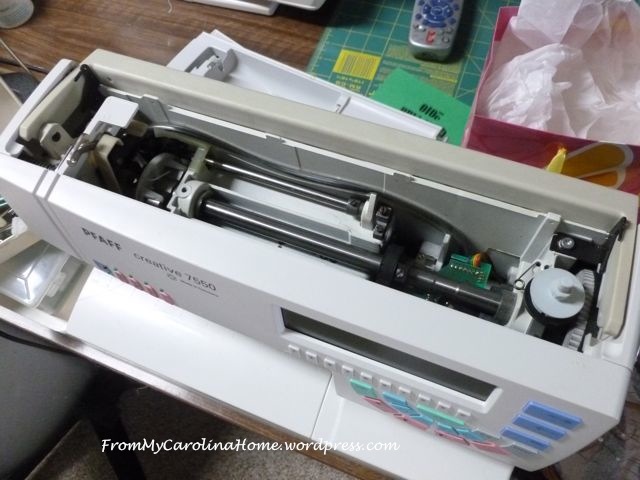
Take out the bobbin case. This will allow us to move the gears without damaging the bobbin case or the presser bar. Blow out the bobbin case with air, remove any stray threads, and put a drop of oil on the mechanism where the parts slide over each other, keeping it out of the area where the bobbin sits. Remove the throat plate to get to this area easier. Clean out the area around the feed dogs.

Back up top, look around for any obvious threads, and there was a big one here.

It was wrapped around one of the moving mechanisms, and deep in the workings. I used a hemostat to clamp onto the thread and gently pull while moving the hand crank to loosen it and pull it out.
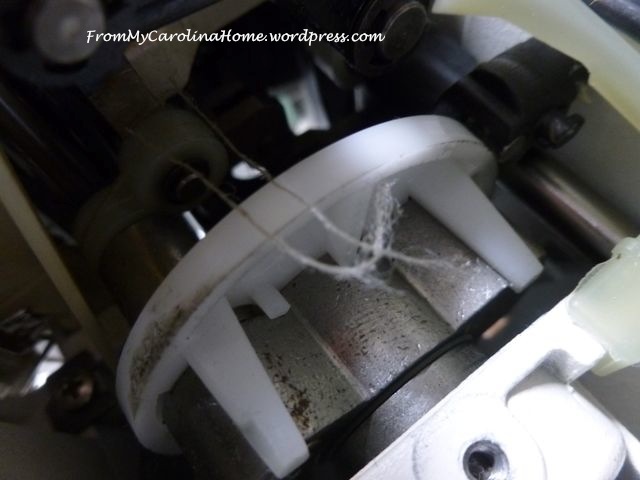
The thread must have been there for some time, it broke twice while trying to remove it. I was able to pull some out, but there was a big loop left. Eventually, I did get all of it. Look for more fuzz and crud on the other moving parts and clean them.

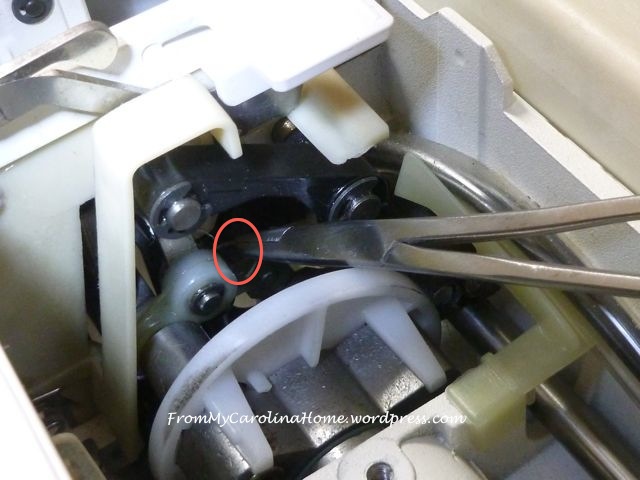
Now look for gears and moving parts by rocking the hand crank back and forth. They need to be cleaned off, and regreased or oiled. All those spots where there are parts moving against each other need lubrication. The hole between the orange circles is a receptor for the screw, it doesn’t allow oil to get to the piston. It won’t hurt anything if you put some oil in there, it just won’t do anything.


Clean off the rods, oil the parts that move. There will likely be gunk in lots of places, so use a tiny bottle brush, and a nylon brush to get out the crud. Moving the hand crank will show you this piston moving along its bar.
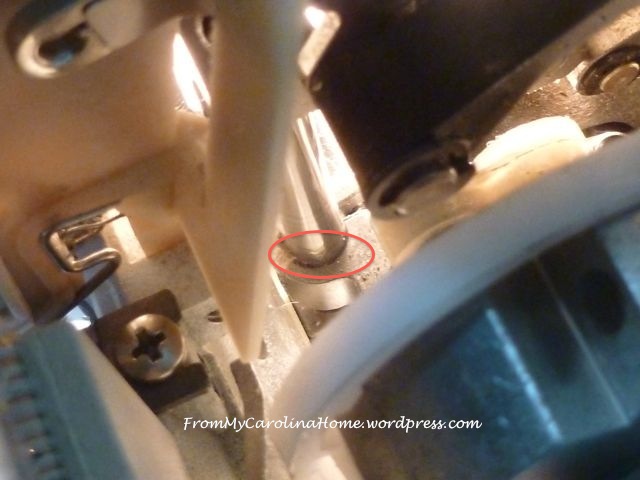
One caveat, do not get any oil on the belt from the motor to the first gear. That will cause the belt to slip and your machine will run but not make stitches. If you think you got oil on it, turn the hand crank while you thread a paper towel under the belt to soak up any oil. Look around for any other gears or moving parts, remembering to stay away from the motor belt.
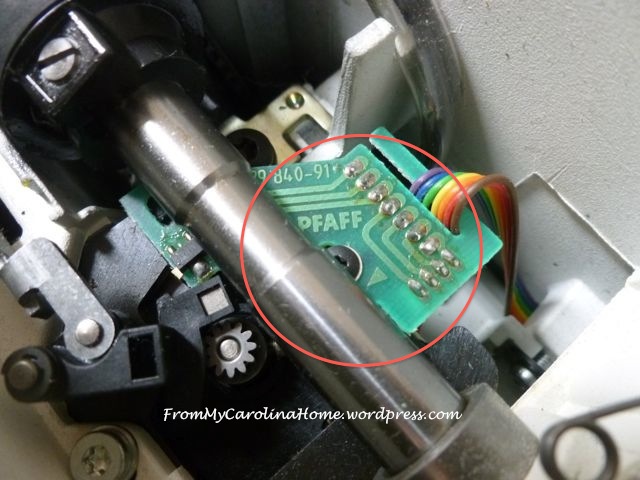
Also, keep the oil off the electronic boards.
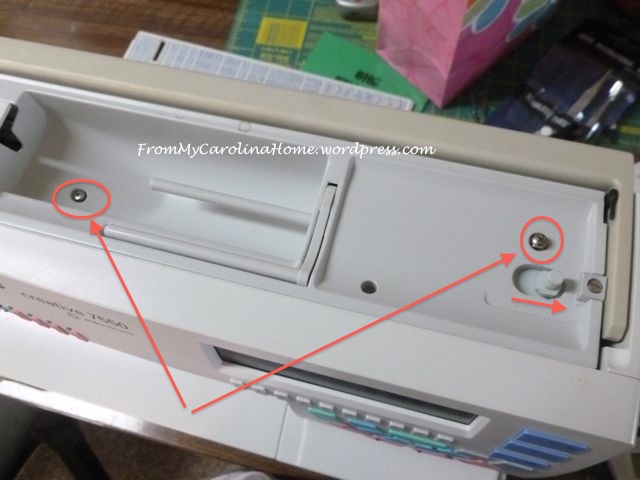
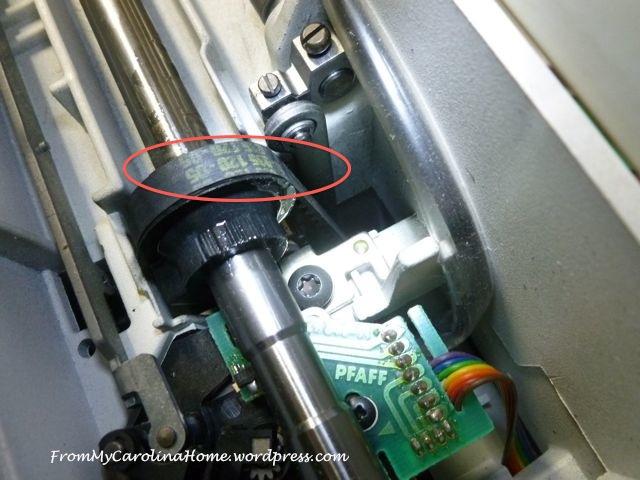
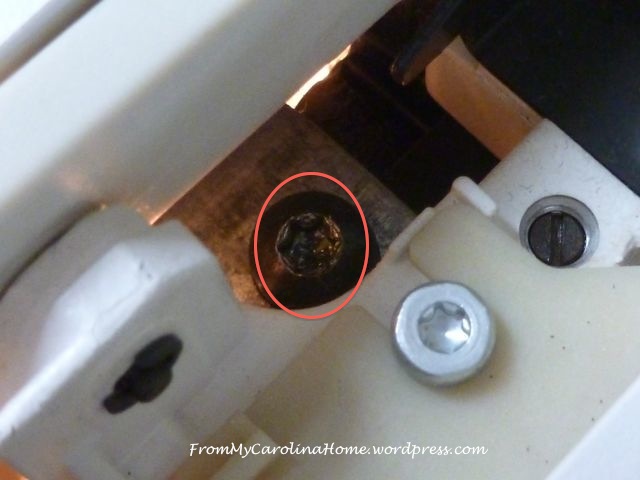
Using a six pointed metric allen wrench, take out the side cover screw. (Update, this screw is a Torx screw, mine is stripped so it looks like an allen screw. See comments below.) Be careful to use the right tool (update -a star screwdriver would be best), it isn’t a Phillips head and you can strip the points if you aren’t careful. Be aware it may be metric and not US sizing. Just another way that Pfaff wants to keep you out of the machine. I removed it, but actually all you need to do is loosen it for the plate to slide off. (I replaced it later with a Phillips head screw).
I borrowed this set up from DH’s garage.
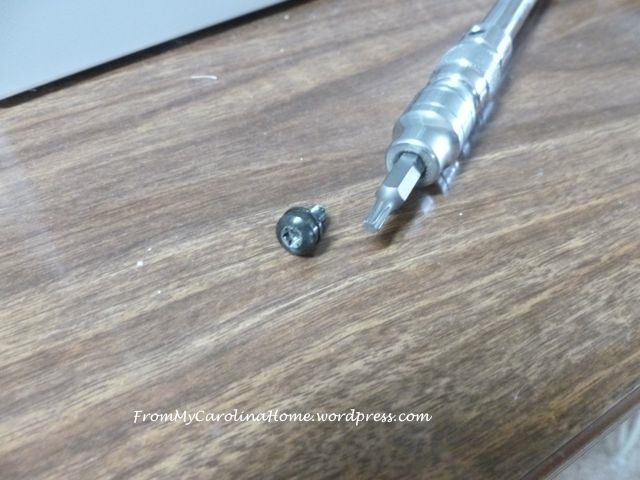
If you have removed this screw with a Phillips, and you don’t have metric allen wrenches, replace the screw with a Phillips head for the next time you need to remove it. Take the side cover off.

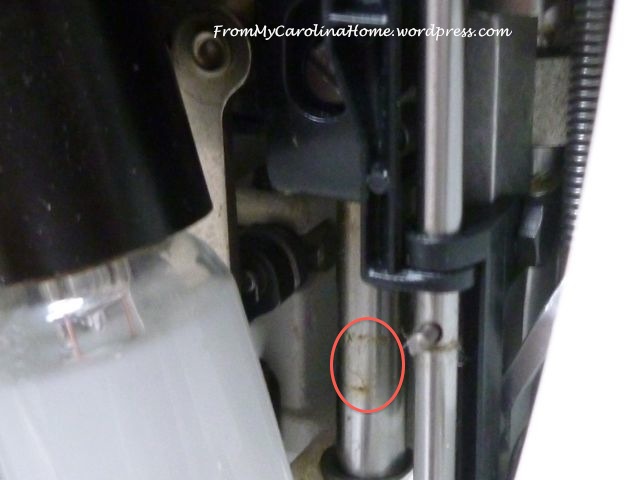
Clean the schmutz out here too, and then lubricate the gears and pistons in this area as well. Update – if your presser foot bar is sticking, try some WD-40 on the area where the rod goes through the stabilizer. Thank you to Rick who reminds us that this is a penetrant for cleaning, not a lubricant. After freeing up seized or sticky parts, you need to blot or wipe up as much as you can and then add the oil.
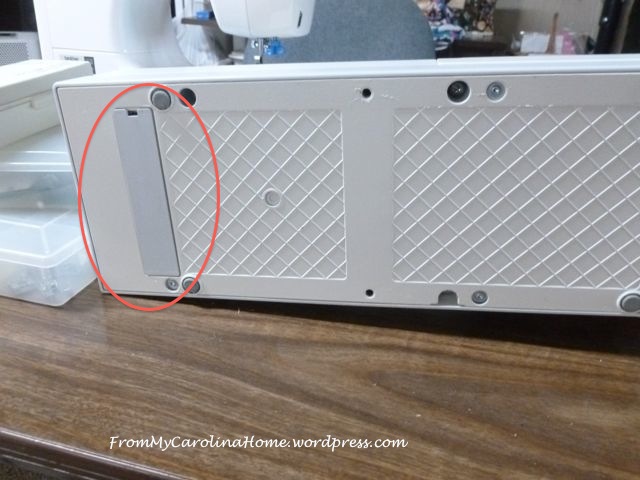
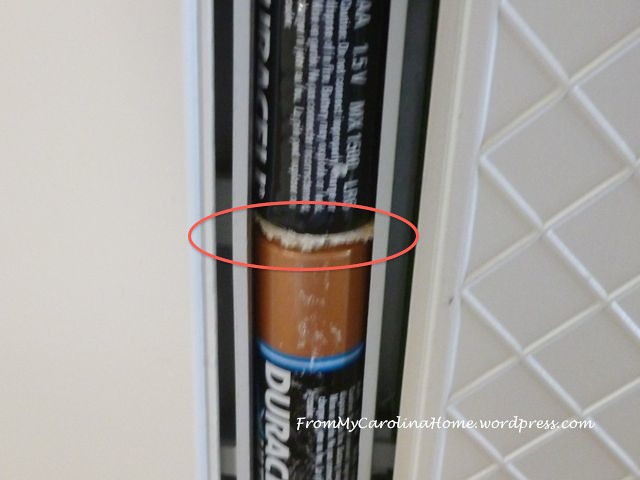
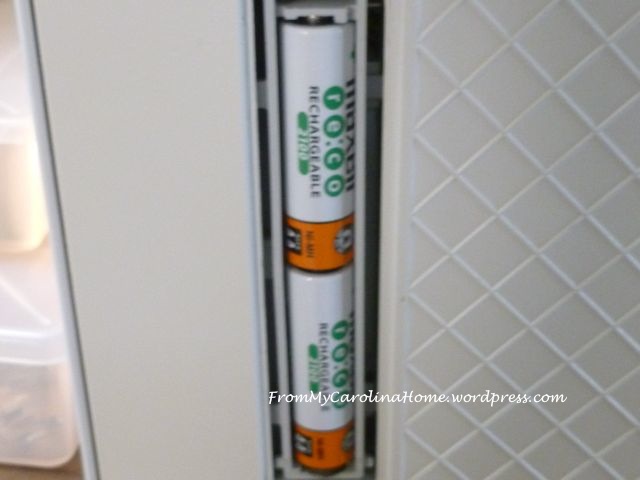
Now, look at the batteries. Just lay the machine on its back, and take the battery cover off.
Oh, heavens! Maybe this is why the screen keeps changing back to German.
A good article on cleaning the compartment is this Consumer Reports article.
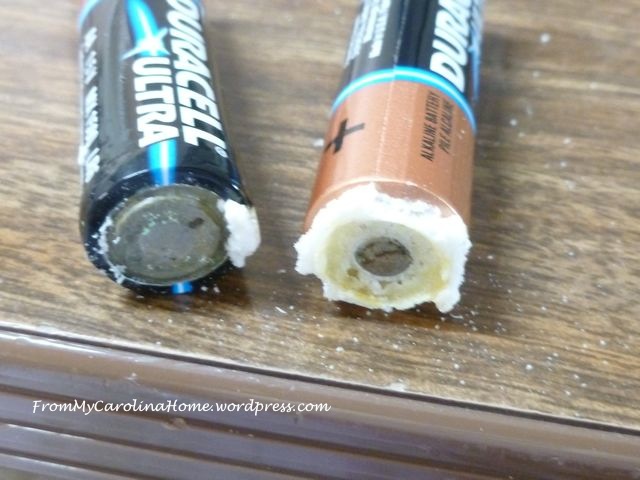
Change the batteries if they are corroded. Replace the cover and set the machine back up.
When you think you have all of it oiled, plug in the machine and turn it on. Step lightly on the foot control to listen to it work. If it sounds smooth, increase the speed. If you hear a clunking noise, or a squealing, there is something you missed with the oil or grease. Go back to the hand crank and follow all the moving parts to figure out where the noise is coming from. Inspect it carefully and remove any gunk, then oil. Then go back to the foot control, and increase the speed until you are pedal to the floor and the machine is running at its highest speed. Don’t worry, this won’t hurt it, but it will be sure that all the oil is distributed. If all sounds good, wipe off any excess oil inside and out so it won’t collect dust and become gunk in the future. Then, turn the machine off, replace the covers, place a paper towel under the presser bar, and let it sit for a day to allow any excess oil to drain out.
Replace the presser foot, insert a new needle, put the bobbin back in and you are ready to go. When you are done, thread it with different colors of thread in the top and bobbin and check your stitches. You can adjust the tensions to create perfect stitches if you know which one is the problem.
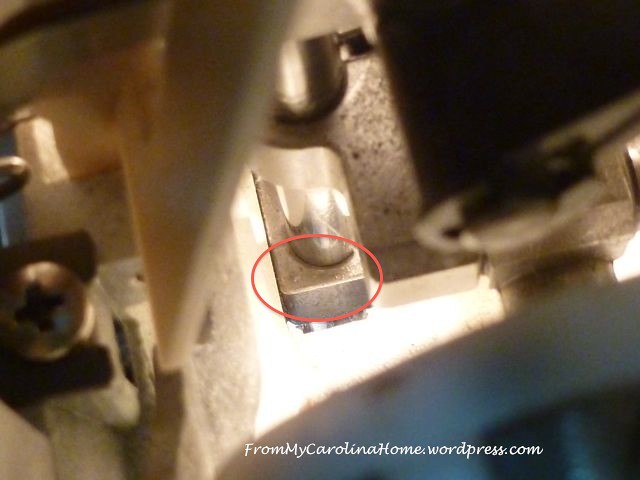
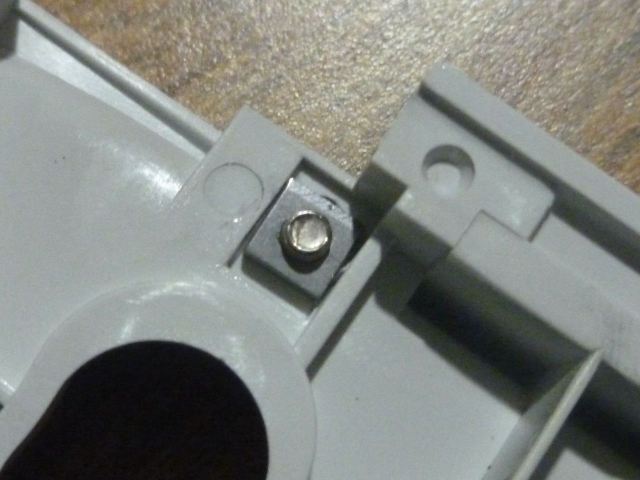
If you have unwittingly taken out the screw that holds the bobbin check in place, here is what to do. It is this one, shown here after the lid has been removed. Note that the notch goes toward the bobbin bar.

If you took it out, the washer that holds it in place is now inside your machine. With the lid off, lift the machine and turn it upside down, shake a little, until a square washer falls out. It fits in the groove under the screw, so you can turn the screw and the washer will stay stationary. Place it there, and turn the screw from the top to get the check piece to stay in place. Tighten gently. One reader has emailed that this screw came off and cannot be found. If this happens to you, go to a small hardware store that has bins of little nuts and screws, and find one to fit the space, then a matching size screw to hold it.
So, don’t be afraid to open up that out-of-warranty Pfaff machine and take a look. That noise you hear, or the rough running is might be a bit of crud on a gear or a rod, a stray thread, or something else that you can easily take care of yourself.

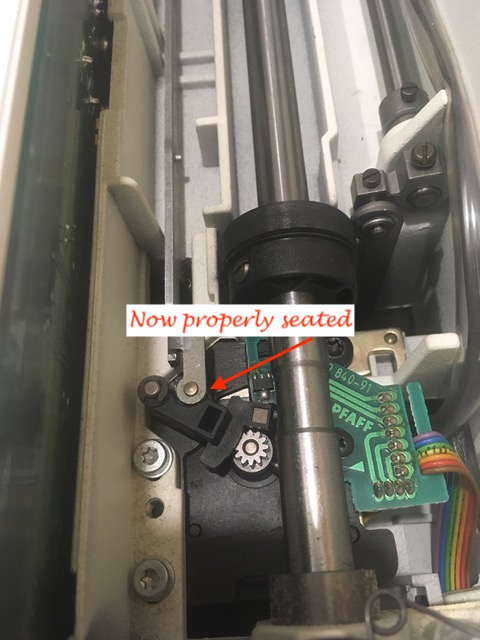
Update, reader Colin wrote recently that he had a problem he was able to fix. He wrote “The needle on her machine would not centre and align properly. I found some other blogs about the problem, but no answer to repair it. I decided to follow your instructions to open the machine and take a look… it was a simple repair. A “peg” attached to an arm had popped out of it’s place and just needed to be slid into place.” Pictures below. Thanks, Colin for this extra bit of information!
Thank you for reading and commenting! Be sure to read the comments below, there is even more info there, and I just added a link to a free download for the service manual. Unfortunately, due to a huge number of spam comments coming on this post (like 60-80 a day!) I have had to close comments.
Update 2022 – I sold this machine in 2020. I apologize, but I cannot answer any questions about it that aren’t covered in the post or the comments below.
My blog is a variety of subjects, quilting and sewing, tablescapes and recipes, book reviews and hand stitching, crafting and mountain living. I love to have new followers, too! See the buttons on the sidebar to follow by your favorite method. If you are visiting from Fave Quilts, Pinterest, a blog hop or link up, please stay a bit and have a look around, my tutorials are gathered at the top in pages to make them easy to find. Lots of fun is had here, and I invite you to follow with any of your favorite methods, see the sidebar for ways to follow. My fourth mystery quilt is in progress for 2018, click on Scrap Dance Square Dance on the sidebar for the first post. Click on the Home page to see the latest posts on the blog, or any of the categories to see tutorials, projects, recipes and more. Thank you for visiting!
Here are some of the latest bargains from my affiliate sponsors. Thank you for using my links when you can, it helps me pay the costs to bring you more tutorials and free projects. –
This week Fat Quarter Shop has 20% the Basic of the Month, and 30% Off the Notion of the Month, plus check out the Daily Flash Sale – something new at clearance pricing every day! Fat Quarter Shop’s Precuts of the Week on Sale!
Fun Stamps on Sale 50% Off at Impression Obsession! Super fun sets including some for upcoming holidays, like Halloween and Christmas, along with those for year round use like Birthdays and Patriotic themes.
Shop the Amazon Outlet for deep discounts on overstocked and discontinued items.

What a great tutorial! Makes me wish I still had my 7570! My mother board went out a few years ago and i was better off getting a new machine. I loved that machine to it’s “death”! LOL
BTW, your machine looks great!!n
This looks so useful!! I am afraid to go inside my machine -_-
Can you tell me the likelihood of a Pfaff 1469 foot control being repaired? Mine has begun to stick in the running position, and I’m wondering if I need to replace it or if it can be fixed.
I may have messed it up further by trying some W-D 40 around the outside of the moving part, but it still works, just continues to stick.
Thank you.
I have taken apart some of mine but never to the extent you did. I need to keep this as a reference for next time. Thanks so much for this.
Thank you, thank you, thank you! I was so very frustrated that I could not get access to the top of my machine!!!!! With a bit of cleaning and oil it sews so much quieter now. Masks can now be finished!
Pfaff tiptronic 6250
I have the Pfaff 7570. Thanks for sharing this. It will be so helpful.
Thank you for this information. It will be possible to clean the machine better between professional care. Thanks again.
Fabulous details and photos on cleaning a sewing machine. I always cleaned and oiled my old machines beginning 40+ years ago. But my newest one has white lubricant instead of simple machine oil, so I am hesitant to do anything but dust out the fuzzies under the bobbin case. I definitely want to learn how to keep my machine in top shape since it was more expensive than any I’ve ever had.
Just a caution, don’t try this on a machine still under warranty, it may void your warranty. It is fine to try on a machine where you have nothing to lose by cleaning it yourself, just be sure your warranty period has passed.
Is there a trick to getting the top off closer to the left by the threader? Mine is coming off, but stuck by the tension dial.
I only know what I have shown in the post, did you take out both screws?
I have this machine but not sure I am brave enough to tackle this 🙂 By the way I love my pfaff .
Grest article, thank you for the photos, I’m will now be able to follow and do my own Pfaff. However, I don’t think being metric is Pfaffs way of keeping you out of the innards – most of the world apart from USA and a handful of other countries are metric, very few are still using imperial measurement system.
Thank you for posting this, sure appreciate it! I service my own Pfaff, too – a 1475CD.
Your tutorial was great! I have the 7570 and I hope you don’t mind if I save this for future reference. Do you know how I can find out how many hours and how many stitches my machine has been used? Thank you again for doing this.
I found your tutorial after I had taken the bobbin screw out on too and now I can’t get it back in….any suggestions? Was there a locking nut on the back of the screw maybe that is now lost inside my machine? Thanks for your help!
I have solved the puzzle of the bobbin check screw, see the post for an update.
anyone know what size the screws in the hook. are? one of them stripped the last time we had to fish out some thread!
can you follow this with the pfaff 1471 as i have 3 and the 7570
I successfully fixed by 1371, which looks very much like 1471. There are excellent video from Brubakers Sewing Center on youtube about a 1471.
Great tutorial! I also use a vacuum with the small electronics attachmentsto clean out lint. Never use compressed air, it can push the lint into places you can’t reach.
Dee, the prohibition against canned air is a myth. If you have the machine apart like this, there is no where you cannot reach. I have used it for over 20 years successfully without ever having a problem. Having said that, the vacuum is a great tool if you have one.
Thanks for this tutorial but I have a PFAFF Creative 1475 CD and I can’t get the under cover off. The left side of my under cover is covered by a cover over the tension set wheel. If you can help me I would greatly appreciate it. I just had my serger serviced and it cost me $129.00.
I wish I could offer a suggestion, but unfortunately, I am not at all familiar with that machine. Sorry!!
BethAnn-I read this tutorial last night and I too have a Creative 1475. I did exactly as she said but had a lot of trouble on the left- just work it slowly and it will slide out toward the back. It will also slide back in a lot easier than it came out!
Thank you for your very informative instructions.
My wife has the Pfaff Creative 1475 CD and it did not stop the needle working when winding a bobbin. Many months later the machine started making an awful grinding noise when sewing. Because it had already been serviced a few months ago we assumed that the problem was terminal so I had no reluctance in following your very clear instructions and took off the top cover to investigate (by the way I found that pressing the right hand clip that holds the hinged lid outwards helps release the top cover).
I discovered that the fault was caused by the main drive shaft being stuck to the drive mechanism by the lack of oil and not releasing when the inner wheel of the bobbin release mechanism was turned – a shot of oil and all was better again.
Thank you
Nigel, England, UK
Thank you Nigel, I’m having the same problem with my Pfaff 1471…. the drive won’t disengage when winding a bobbin…. dread taking it to the shop…. may try opening it….uggggh….nervous…. love my Pfaff, can’t afford a new one, had this one for over 30 years, can’t tell you how much sewing I’ve done…. amazing!
I too have a 1475 CD which I love. I took the 2 top screws off as Carole suggested then if you get a flashlight an look down between the top and side cover, you’ll see a screw that needs to be loosened, you don’t need to remove it, just loosen. top came off!
Thanks for this. Worked great on my 1371 Creative
Hi, I loved your detailed instructions! I need help please removing the side panel on the right of my Pfaff 7570 or help accessing the clutch. I removed the right turn wheel, then the screw underneath it…however, a spring jumped out. I know it goes in the recess of a black disc but I’m trying that portion & fix the bobbin clutch (needle moves during bobbin winding even when disengaged). Thanks much!
Unfortunately, I didn’t take the right panel off myself, and I no longer own that machine to try. I just sold it in March to a friend. Subscribe to the comments, and I’ll post your question, hopefully someone else can help.
Me again…I figured it out:) So simple, the spring just lays in the little, same-sized, groove. However, new question: how do I safely lubricate the plastic-to-plastic bobbin winder clutch parts? Do I use the blue grease or sewing machine oil? I cleaned all of the parts but the needle still is not disengaging during bobbin-winding.
Also, after removing the belt on the handwheel, shouldn’t the handwheel slide off of the drive shaft to the right of the machine? Please let me know if it’s removable or not…thank you:)
I cannot thank you enough. My Pfaff 7550 is making way too much noise and everything is closed because of the COVID-19 virus. I am going to tackle the machine tomorrow with your post next to me.
I have this same problem. Did you figure it out?
Thank you so much for this excellent tutorial! You have done an amazing job with text and pics. I feel confident to take that baby apart and tend to it!
Where do you clean the tension discs? I have a 2054 and it is looping underneath. Gonna tackle this tomorrow.
I just pulled my 1471 apart as the bobbin winder wouldn’t disengage the main wheel. A much needed maintenance and oiling and now it purrs. You didn’t mention this part in your tutorial but it worked like magic to put oil into the slots where the wheel engages. I am so happy to keep my old friend working. Took it on my sailboat, even. Not too happy running through the inverter as it is a square sign wave but it worked well enough. Thanks for all your help.
Good point! Just be sure to keep the oil off the belt nearby, as the belt will slip on the wheel and your machine won’t make stitches.
Just ordered an LED light bulb for my 7570 –Googled and found you. The repair man I used retired so I am going to do the maintenance with your great instructions and photos. Thank you for sharing this knowledge with us. I am also having a problem with the bobbin winder. It takes off going unusually FAST. When I take my foot off the foot pedal, it continues to run for several seconds and makes an awful squealing noise. I’m thinking plastic gears? I can wind the bobbins on another machine so I might not try to fix that.
I’ve bought a 7570 today for a great price, but I no nothing about the machine. I think it is dire straight for a service as the lights turn on and that’s it. The screen turns on but nothing else. Any info would be appreciated and thank you for a service manual. This is such a great article and I’ve saved it
What a terrific tutorial! I just picked up my Pfaff 7550 at an estate sale at a great price. The presser foot does not seem to want to go down, so I started searching google for ideas on how to fix this problem. What I found most was people wondering how to get the case off. Voila! I found your tutorial with great pictures and nearly cried with joy!!! Thank you for doing this for all of us out here!
Thank you for this tutorial. I opened up my 1475Cd as per these instructions. The closest Pfaff dealer is now 25 miles away so I’m reluctant to take my machine in for something I can do myself! Only problem is, my presser bar won’t go down (the reason I started taking the machine apart to begin with). Is this something I actually need a technician to fix? Any advice?
Thanks!
Carol
Hi Carol,
Without looking at it directly and piddling with it, I can’t really advise you. But presser feet are generally just mechanical levers, and maybe it is stuck with gunk on the bar itself. Give it a good clean and see what happens. You have nothing to lose by trying if it is an older machine out of warranty. Good luck!
Carole
Hi there thanks for an amazingly detailed and well photographed tutorial.
I have just purchased a pfaff tipmatic which I had serviced and while sewing it had an amazingly large number of lint which is making me suspicious that when it was serviced it wasn’t properly cleaned. It came from a grotty place so cleaned it up on the outside. My light also didn’t last long and had to buy another one from the shop they wou,dnt give me another one and went out and thought it may have been loose but was able to out but not get back in. The diagram of the light inside clearly shows the angle and will make it easier next time I changed a bulb. Their excuse was movement in the car can damage the bulb.
Re the corrosion with the batteries just wondering if you could put some advice re cleaning the corrosion in the compartment and judging if the corrosion is not so bad that it hasn’t wrecked it. I had a toy cash register that I accidently left the battery in and corroded it so much it no longer worked embarrassingly found this out when buyer came to pick it up. I googled how and found a good website on how to deal with corrosion and ended up having to put some foil in it to make it work but buyer was happy and reduced then price for her. Thanks again for your great advice I had the courage to buy this machine after saving a group of four machines and an overlockers I bought for eighty dollars after seeing a repair cafe here in Melbourne Australia. It cost me two hundred and fifty to service as the foot pedal had to be adjusted. Well done ✅
Hi Carole, I just purchased my 1st Pfaff 7550 at a Pawn shop. It has everything imaginable with it , also the tote pull along case. It looks brand new , but the reciepts said it was purchased in 1995 for $ 4,395.00 . I am paying 139.99 plus a 6mon. warranty all for a great price. I am not sure what to do with it all so I will stay in contact with your page incase I need to look things up. Thank You so much for your cleaning the machine post.
I inherited my Aunt’s Pfaff 1475CD 3 years ago and haven’t used it yet. My local sewing shop recommended bringing it in for service. I’ve always serviced my own Singer 401A (the instructions are in the manual!) so I couldn’t imagine that servicing the Pfaff would be any more complicated. Your post has given me confidence to tackle it! Thank you!
Finally found the directions for maintenance.thanks. however I’m afraid I really messed up. I was unable to get my 1475cd to fill the bobbin. Like others I had trouble removing the front left corner ,but concentrated on the bobbin winder. When I noticed something fly out of the top. I found a very small round pice of white plastic the broke off of something and now the bobbin holder flops around. My Pfaff dealer has shut down and I’m in a pickle. Can you give me any advise?
About the only thing you can do at this point is contact the closest sewing shop and see if they have a sewing machine repair person. Most shops have someone they know of that will work on older machines. Good luck!
Excellent tutorial. My Pfaff 7550 was putting big loops on the bottom. I was pretty sure there could be thread in the top tension disks, but couldn’t get to it, or even see it. This showed us how to get the top off and see and remove the thread. Thank you so much!
pfaff 1473cd zig zag is broke goes back and forth sideways and now nothing works I turn machine on and a little motor runs and needle viberates sideways makes lot of noise
Some things cannot be fixed with cleaning, this sounds like a repair person needs to look at it.
I have a 1981 Pfaff Hibbymatic 809. Love my machine, they don’t make parts for it any longer.
Was sewing and foot pedal quit working. Called Pfaff parts, didn’t have new one for me but they found company that did.
New one arrived still doesn’t work. I pray the dealer repair ship can fix my machine.
Of course they just want to sell me a new one.
what does it mean when my PFAFF 7570 won’t display the stitches on the display screen ?? I keep the machine clean and have changed the batteries but the needle just stays to the far left side and the display screen is yellow with black lines on it….has my machine been worked to death ????
Unfortunately, probably it has. When the computer boards go bad, it is less expensive to find another one gently used and get that one, rather than to fix the one you have. Boy we love these machines don’t we?!!
Awwww…my screen display on my 7570 is okay until it has been on awhile, then it kind of ‘darkens’ but I can still see the stitch info and everything else works. Drat! Looks like it may be starting to fade. I love that machine. Thank you so much for the tutorial!!!
Thank you! I am so glad you found it helpful. If you haven’t already, check the batteries, they might be giving out.
Finally !! I can remove the top and look for what is making that noise without breaking anything ! thank you !!!
I’m feeling frustrated w my Pfaff 7550:
Not consistently but it is looping terribly on the bottom.
I thought it was me using a cone thread feeder but no difference…
Tried rethreading and new needle.
The only thing that helps is if I go really really slowly.
Recently had issues w the foot control working, think it’s a speed/timing thing?
Tension seems fine when I lower foot and pull top thread it’s nice and tight (mid level tension set.)
Going to take it in next week but wondering if anyone here may have advice.
Thank-you so much for putting this tutorial together .. I had a piece of cotton break off inside my 7570 and being both broke and 3hrs drive from the nearest town, sending it in for repair was totally out of the question, but now it’s removed, cleaned, oiled and running great 😀
This is fantastic but I still do not know how to take the sewing hook off. There’s a piece of thread stuck that I can see but it hangs on for dear life. Surely the must be a button or something like that there? I have the Pfaff 1475cd.
Wonderful instructions. This saved me money but most importantly time in a crunch. My daughter wants to have a quilt done by Monday, not sure it is possible with a working machine but at least now we can try. My presser foot wasn’t going down properly. Cleaning and oiling it fixed the problem. I am very grateful to you! Happy sewing!
Very nice tutorial. Thank you. I have a couple of comments that may help someone performing this maintenance procedure. Regarding your description, “Using a six pointed metric allen wrench, take out the side cover screw. Be careful to use the right tool, it isn’t a Phillips head”. Actually, that screw has a Torx head (neither metric nor SAE). Using a hex (Allen) bit or a Phillips screwdriver may strip the screw head. By the way, that screw on my 7550 was a Phillips #2, so I don’t know the Torx size of your original screw.
To clean and lubricate the hook shaft and feed system you can take off the baseplate by resting the machine on its back and removing the four Torx screws (T25) underneath the machine at the base of the tower. Remove the baseplate slowly so as not to put stress on the ribbon cables. Rotate the baseplate 90 degrees clockwise and rest it against the machine. Remove two slotted screws from the bottom cover of the free arm, and gently remove this plastic cover observing where the ribbon cable goes. Clean and lubricate as needed and reassemble. This is also how you get to the hook assembly if you need to remove thread wrapped around the hook. To disassemble the hook assembly requires further procedures.
I have the Pfaff 1471, 1475, and 7550 and with minor differences your tutorial is a good guide for all those models.
What screw would you replace a stripped screw in a 7570? hook shaft?
I found my answer. Loosen the screw on the bobbin stop, ONLY ONE TURN, slide the bobbin holder to the right. Then tighten the screw. This may have to be repeated
Replacement screws can be ordered from Brubakers sewing center. I ordered via email and paid via PayPal. Easy
Brubakers is a very expensive source, try Sewing Machines Plus, or do a search.
The Torx size is a T25.
I have been watching these correspondences for a while now.i have a Pfaff creative 1475 cd. The bobbin winder slips and I feel as though I can now access this section of my machine. But then what, belt replacement? Where do I find the appropriate belt? Or is there another remedy for which I should be looking ?
Best illustrations. Thank you.
Though I do have problem with the bobbin shuttle (holder).
Would you plse be so kind to tell me how to replace it back into the machine.
It is a Pfaff 7570.
Trust you will be able to assist.
Thanking you so much
Marinda
South Africa
Sent you an email but it came back as undeliverable. I’m not sure what to tell you, as I have never taken the entire bobbin shuttle out of the machine. I only clean around it and from the top under the throat plate. If there is a sewing machine dealer near you, they may be able to help by looking at the machine and your pieces, but without having it in front of me I cannot be much help. Sorry!!
Carole
Dear Carole, You have motivated me to take the entire mechanics apart and soak them in solvents and oils. I’m also going to viddy the circuit board for failing parts (bad solder joints, bulging capacitors, etc)… However, the problem of the day is STITCH DENSITY. That is, I set the stitch length to 2.5 and get micro stitches. I set her to 4.0 and get much closer to 2.5 …
New baby due in September and I”m getting way behind on all those projects 🙂
Tim&Beth
I don’t know if you’ve solved your problem yet but when this happened to me it was because I had previously lowered my feed dogs to sew on a button and then when I lifted them back up, they were only partially raised. This allowed the fabric to feed but it didn’t feed well and caused the stitches to be shorter. The partially raised feed dogs couldn’t move the fabric at the proper pace to get the correct stitch length.
I did not receive an error message so the machine must’ve thought the
At the feed dogs were fully engaged. All I had to do was engage the feed dogs again and all was well.
Dear Carole,
Very impressed with your Pfixing the Pfaff. Perhaps you can help me: Our 20+-year old Pfaff 090A, looks very similar to yours; there is a problem – When I lift the Presser Foot with the lever, no problem, but when I release it, the foot doesn’t go down, I have to force it. I have oiled the verical conduite holding the shaft, but no improvement. If you can give me an email address, I can send photos showing the probleM.
Thanks Bob (writing from France)
Thank you so much for your helpful instructions my pfaff is now running smoothly for the first time in years despite being “expertly” serviced 3 months ago.
Thanks, I have an old 230 from my grandmother I have had serviced. Good to know I could work on it myself when next it needs some TLC!! Love Pfaffs.
Dear Carole, Thank you for sharing your knowledge and experience accessing the insides of your Pfaff machine. It gave me confidence to tackle removing the top of mine; after applying oil (on a very long skinny paintbrush), the stuck presser foot lifter mechanism works again. It has saved me a trip to a repair shop an hour drive away.
Fantastic tutorial. THANK YOU.
I was just looking for instructions on how to remove the left side cover on my 7550 because the presser foot bar was sluggish, but this tutorial is so pertinent that I ended up following all the instructions. Surprising how many stray threads and how much felt-like lint was in there, despite doing the recommended “homesewing” cleaning/oiling all these years. Machine is now humming along quietly and smoothly again — I’d forgotten how quiet it was back in the old days.
Hi, what does it when my Pfaff displays all the lights and you can only do the straight stitch? Is it at the end of its life?
Most likely, but you should take it to a dealer to be sure.
How fresh is your battery?
Try adjusting the contrast. There’s a small dial hidden in what looks like a vent (the rectangular openings) under the screen. 🙂
Woo hoo! I thought the dim display meant the poor thing was about to die. I had no idea that dial was there. Looking great now. Thanks!
Thanks for your post. my 7550 pressure foot not working doesnt go all the way down. i have cleaned it as per instructions but would like to get a service manual if possible to try to fix it after my experience today. after cleaning I turned machine on and found the screen just yellow it had been faint the last time I turned it on. and I dont have the manual, so I thought I would take machine to only shop that I had purchased the machine from many years ago, to ask about cost of service (on the other side of the city) They turned it on viewed it and the two staff members said they had no idea but I could pay $160 and they would send it out to their mechanic. and replacement circuit board would be a lot more extra. I had been searching on the internet for information but no luck, but unable to find a copy of this, Having changed my computer I then decided to check the old hard drive, and amazingly found this again. There is no way I would have any faith in the designated service agents after this, neither of them mentioned or tried the brightness dial, after reading your post about the dimmer control that I had not noticed previously and now I have screen working, I had also just changed the batteries, but got change batteries message. So I tried another couple of new ones and this time it went away. Now my only problem is the pressure foot. if anyone can help me please do so as I cant sew until this is fixed.
For those who also need a service manual, you can download it for free here – Pfaff 7550 Service Manual – please consider making a donation to that site for the service when it asks.
I had the same problem with my 1475. The presser food wouldn’t go down. I did the cleaning procedure as described, and oiled the parts, but I couldn’t get into the part of the machine where the pressure foot mechanism was located. I decided that there was a broken part, and took it to a shop with a repairman. In a week I got the machine back and no new parts were needed. I imagine it was some solidified grease that had made the presser foot stick. I would like to know if you are able to fix it yourself!
A sticking presser foot seems to be a common problem, you might also try some WD-40 where the presser bar goes through the stabilizer ring inside the machine’s left door.
Thank you so much much for this thorough write up. You have great pictures too. It helped me a lot.
dear Carole: thanks for the awesome tutorial. First time in 30 years I serviced my Pfaff myself.One question…how do I know which gears/pistons to oil and which ones get the “grease”?
Thank you for such an in depth tutorial. You were a life saver this morning when I got thread stuck in my machine and couldn’t figure out how to get the cover off
I discovered this article a day ago! It was a huge help as I cleaned my 7550. Thank you so much! 😊
Thanks so much for posting this with such clear pictures and instructions. I have a 1471 and one difference I found is that you have to take the side plate off first before you can remove the top. I found a video on youtube where the guy took the covers off of a 1471 but he did it really fast and didn’t really show how to do it. He was just trying to get inside to look at that.
I have a 1471 too and I’m looking for the proper way to remove side plate. The large plastic screw on the handwheel has broken and I have to remove the end somehow as it will stop me screwing in a new one
Thanks for this suggestion. I have this problem as well
This is an awesome tutorial. I’m trying to fix my 1475 CD because my newer machine has to go in for service. Being without my newer machine for 3 weeks is so traumatic. I thought if I could get this old thing running I might be able to survive. LOL! My issue occurs when releasing the presser foot lever the presser foot does not want to slide down by itself. Your turturoial shows how to take the machine apart…now if I can just figure out how to go from there I might be in business! 🙂
I also have a 1475 and found this tutorial perfect for getting inside to lubricate it. I never could figure out how to get the gunk out of the pressure foot lever, which was failing to go down at all. I eventually took it in for service. Let me know if you can fix the pressure foot! I would love to know how you did it.
I will let you know
Just wanted to say thank you all these years later! My presser foot was not dropping properly and I had no idea how to fix it. Following your instructions for oiling, and now, all is well again. I especially appreciated the reminder that we are out of warranty. Made me more willing to take careful risks.
My husband and I worked and worked at solving the machine issue. We finally threw in the towel. As it turned out the machine needed new parts. Now that my machine is back home it works like a charm.😊 Cost me $130+ to repair the presser foot issue, clean the machine and replace two corroded batteries. Good luck!
My Pfaff is a bit older and definitely needs some maintenance! Your tutorial is so very helpful! Thank you for the very clear directions and pictures!!
Thank you for your tutorial! Could you please explain more about where you grease and where you oil the moving parts? How do you know which parts get the grease ? What type of grease is suitable?
Use gear grease on the gears – the meshing parts that have interlocking teeth. Use oil everywhere else. Oil will work its way under pistons and sliding parts smoothing out the action. The grease tends to stay put, and is better for interlocking teeth on gears.
Wow! After spending a small fortune to get my Pfaff pfixed and it still doesn’t work, you have given me the courage to open it up myself.
I love my machine!
I never used blue grease. If I google it can I buy any blue grease or one specifically for s.m.
Can I buy that in a fabric store or Walmart?
Carmen
I use the grease supplied with my longarm. I’ll try to find out more information, and will post it here.
Thank you! I always cleaned my old Kenmore myself. I couldn’t figure out how to get into my Pfaff 6122. It was in storage for a couple of years and got gummed up. I spoke to the local shop but it would run about $200 to have them do it. You are a life saver!
Do you have any information on how to find the number of hours a machine has sewn. I’ve heard that some of the newer Pfaffs have a technician code that will display the hours.
No, sorry I don’t know how to do that. I wish I did!! If anyone else knows, please comment.
Thank you, Thank you, Thank you……..I am now unafraid to open my beloved 7550 and maintain it!! Nearest shop is 50 miles away and they only want to sell new machines. I do have one problem that I don’t know how to fix. My machine is now sluggish to come up when I turn it on. It can take up to a full 30 seconds before it clicks rapidly and then the screen shows fine and it sews without a problem. Any ideas??
Thank you so much. I feel so empowered Also where can one find the programme paper fore my beloved 1475cd..The download from Pfaff is slightly smaller than my used original.
Bless your little heart for you time
Marilynne
The download for the 1475cd is in 3 parts, hope this helps. I have the 1471
Maureen
http://www.pfaff.com/en-US/Support/16150
I was trying to figure out how to lube my wife’s 7550 and found this with a Google search.
Wow, I can only imagine the amount of effort it took to set up and edit all those photos. Thank you for your effort.
Thank you so much for this post! I have a Pfaff 1151 and was having a horrible time getting into it to clean. I have done other mechanical machines before but this was a buzzard! It is now cleaned and oiled thanks to you! You just saved me $60. I really couldn’t afford to pay out right now and my machine is purring like a kitten!! I am so grateful to you Carole!
This was a great tutorial. I took my machine apart and sprayed really well. It sewed great but the pressure bar lifter was stickey.
It was frustrating getting it back together and now runs smooth.
Thanks for the confidence.
I think when you’re still getting thanked more than 3 years after the original posting date then you know you’ve done a good thing. I was looking for service information for a Pfaff 1475 CD and came across your site with a Google search. While this is for a 7550, the method for opening and servicing the machine is basically the same. This will really be very useful to me.
Thanks!
hi there, great tutorial because i had given up trying to find one for my wife’s quilt expression 2046. all i was really needing was the method for removing the plastic housings around the machine so i could get a look inside. it had stopped because something was stuck. fiddled around a bit and voila, it now is working again. the wife will be sooo happy.
gerry
Thank you for this tutorial. I had the same bobbin winding, disengaging problem that a few others had. Now I can wind bobbins again, although not perfectly, & the machine is much quieter. I’d thought the machine was terminal but now have hope it will keep on humming a bit longer. I don’t hesitate to fiddle with my Featherweight. Don’t know why I thought I couldn’t dig into this machine as well!
Dear Carole:
Using your tutorial, I cleaned my 1475CD.What a time and money saver! But now I am having issues with the bobbin winding. When winding, it doesn’t seem to engage or slips.It gets “stuck” and winds uncontrollably fast and uneven , when I play with my foot pedal and try and slow it down, it either won’t wind at all or winds slowly but with the needle going up and down.(even tough I have it it disengaged). I was wondering if this was perhaps because I may have dropped oil on the belt when cleaning? I really do not want to pay big bucks to have someone fix it! Thanks
I don’t have that machine, so I am not really familiar with it. But, as general advice, I would take it apart again and make sure you didn’t get oil where it doesn’t belong, and that the bobbin engage area wasn’t moved in the process of taking the covers off. Good luck!
Thank you! I have the Pfaff 1472 and have been having problems with the presser foot not going all the way down. Your tutorial is wonderful! In the 30 years I’ve had my machine, I’ve never had the covers off! For those asking specifically about the presser foot, I oiled the shaft, etc, but it wasn’t until I oiled the little extension pin (not sure what it’s called) that goes up and down when you raise and lower the pressure foot lever, at the very top of the machine, AND when I removed all the dried out oil gunk from off that extension– it wasn’t until then that my pressure foot worked normally with that “snap” into place like it should. I hope this makes sense. Thank you, again!
I recently treated myself to a lovely Pfaff Creative 1467, but I cannot get the bobbin to seat on the winder. When looking at the winder, it is lower in the machine than my other Pfaff, I am afraid to take the top of the machine off in case I break something, but I really need to see what is going on with the winder. Have you come across this type of problem before? Is it a job for my local repairman? Please help!
Hi, Joan, is the bobbin the right one for that machine?
Maureen
I Need a lead plug cord for my Pfaff Dial-A-Stitch #130-6. Any idea how I can get one?
You might try Sewing Parts Online, or Sewing Machines Plus.
I have a Pfaff 1473 cd. There is a terrible squeal coming from the hand wheel when I sew. Any suggestions what might be the cause?
I would say it needs a good cleaning and more lubrication. Squeals are typically surfaces scraping against each other – plastic or metal. Have you tried taking it apart to clean off any gunk build up?
Thank you so much! I was able to get the thread that jammed my Pfaff 2044 out!
This tutorial was a life saver for me also. The bulb on my 2044 burned out, and when trying to insert the new one, the light fixture detached itself from the clip. Once my husband showed me where he keeps the Torx drivers, we were able to re-attach it, and all is well again. Thank you, thank you, thank you!!!
I have a thread stuck in tension rings inside my 2170. It just came back from cleaning so I can’t afford to take it back in. How does case come apart so I can pull thread out? I’ve taken the three screws out on top of case but not releasing; any help is appreciated
This is fantastic!!! I have several older pfaffs so I am going to give this a try. I didn’t want to spend $140 on each machine to get them cleaned.
I have a pfaff 2144. When I turn it on with the presser foot up, it starts calibrating to start but doesn’t quit. Just keeps making the noise like it is trying to set itself to sew, but keeps going and going. When I start it with the presser foot down it doesn’t do that. Do I need to take it in for service or do you think if I clean it that might help? Thanks again so much. It must be nice to be able to help so many people with your posts and know that people are still using your directions many years later!
I’ve used your video to clean and maintain my 1475cd but now it skips stitches when it comes to stitching over folded seams or any thickness more than two. I’ve changed needles but to no avail. The tension disc seems to very loose. Help.
If you have changed the needle, rethreaded, cleaned as best you can, and made sure there isn’t anything in the bobbin case, it is time to take it to someone to look at it. I wish I could be more help, sorry, but some things just need a repair person to fix.
Thank you for your great tutorial. I recently inherited my Moms 7530. When I turned it on the display screen looked like jibberish otherwise the stitches were beautiful. The batteries were corroded so my mechanic hubby said he would look at it. I am really hoping that it’s repairable. Any suggestions?
Thank you! My 7570 had thread caught in the exactly the spot you show in your photo. I had no idea how to get inside (tried reaching up by the bulb with long tweezers and got some of it). I love my machine and now love that I can take better care of it.
Thank you very much for this great Tutorial! I had searched all within Germany where I live and we bought such great machine, to find how to uncover my 7530 which is very much the same, as now your tutorial helped me to fix this issue – thanks a lot
Juergen
Thank you very much for the information. The two top screws on my Quilt Expression 2044 are T15 torx screws, and they don’t lift completely out of the top plastic piece. Since they just screw into plastic, I didn’t tighten them very hard when I put the top back on.
Hi, Carole,
Any chance you might know how to take apart a Pfaff 6085 Varimatic (to at least remove the top cover)? Or perhaps you could direct me where to find that info. My presser bar lifter lifted the sewing foot holder but when pulling the lever down, the holder does not come down. The machine is about 25 years old and used ithe first couple of years but infrequently since then.
I sent an email to Pfaff support, but no response (probably due to the pandemic).
I’m having the same problem, with the presser foot not lowering (though apparently mine was dropped at some point, so who knows if it’s fixable). If/when you get a solution, would you mind commenting back here?
I am not familiar with that machine at all, sorry. There is a manual for it online, but I don’t think it tells how to take the cover off.
Click to access Varimatic_6085_6087-manual-EN-DE-FR-NL.PDF
I have a Pfaff 1473 cd. I live in Canada. I took it in to be serviced because of a squeal coming from the motor. The technician told me there was nothing he could do about it. That is the only thing wrong with the machine. Is it possible to get a replacement motor for this machine?
Thanks for this. After not using my 7570 for 5+ years, I hauled it out to make Covid-19 masks… it worked surprisingly well, but I was having one heck of a time with the presser bar… lower the presser foot and it would slowly — like snail’s pace slow — lower… but still not low enough and I’d have to push down on the presser foot screw to get it in place.
I got through a batch of masks, but it was painful… and then I found this. The machine was reasonably clean inside, but I oiled the presser bar just a bit and then hit it with a hairdryer and now that presser foot lowers like my grandma stomping on a spider.
I just picked up a Varimatic 6091 today. It wasn’t zigging or zagging. Getting the end cover off was a mystery. Thanks for the allen wrench idea. Worked like a charm. A little oil on the zig and zag moving parts and heating them up by running it a bit and we are soooo in business.
My 35 yr old Pfaff got a thread hung in it and stopped working. Your article enabled me to get in there and get it running again. Thanks!!!!!
Thanks to your blog and some of the comments I was able to fix my beloved 7510. I was having the problem of the needle continuing to move while I wound a bobbin. A tiny drop of oil fixed it. While it was open I found a long thread wrapped around one of the moving parts. I’ve had my machine since 1998. I panic every time it shows any sign of giving up the ghost.
Thank you very much for your help with the lubrication and other handling of the sewing machine!
Éva from Hungary!
Motor seized up. Is this hopeless?
Success! I worked off and on for several days on my frozen Creative 1371 machine. After reading a bit more about “seized” machines, I realized the problem was not the motor. I cleaned and lubricated the inside of the machine but all parts were still frozen. I watched a Utube video and read another article which used heat from a hair dryer to soften the hardened oil/grease. I applied heat for a good 5-10 min, avoiding plastic and wiring, and periodic checked for movement in the flywheel. Suddenly everything moved and I was back in business. I removed any crystallized or sticky oil/grease I could see, checked the lubrication and put it back together. Thank you Carole for giving me the confidence and knowledge to fix my sewing machine. Yahooooo
Is there a way to just open the left side of the machine to change the bulb and check the needle arm that goes up and down
No, you have to open up the top to get to the screw inside that holds the left cover on. See the photos in the post.
If you accidentally disconnect the needle threader while opening up the machine, take off the side cover to reconnect the hinge. Thank you, Diane, for that bit of information!
Comments on this post are now closed due to a high volume of spammers attacking this post. If you have questions, you can contact me using the form on my About Me / Contact page, link at the top of the blog.
I know it’s been 5 yrs since you posted it, and I don’t know if you are monitoring it, but your post saved my bacon. We just found & bought a Pfaff 7570 from the local thrift store for only $150. It is barely used based on none of the surface scratches you would normally see on a reasonably used machine. However, we noted that when we dropped the presser foot, the movement was very slow, like things were gummed up. It turns out the vertical shaft was gummed up. But I had no idea how to open the covers to get to it until your post showed me how, and also what to do about it. I used PB blaster though since I had a bad experience with WD40 once. It took a bit of working it in, but it broke free and moves very smooth. So, do you have a similar guide for the bobbin area? I am getting some clicking that disappears when the bobbin case is taken out and running without actually sewing.
You may need a new bobbin case, check to see if it is still round and not warped from being dropped or damaged. Do oil the race as well, and let it sit then wipe it out well so you don’t get oil on your projects. Hope that helps!
Thank you for sharing your Pfaff 7570 tutorial. It is so well explained and photographed, it made cleaning and lubricating easy. Well almost easy, I admit I had to re read some several times. It’s great to have my machine purring again. I also have a Pfaff Varimatic 6091 that had a presser foot that would not go all the way down. There is an excellent YouTube tutorial on how to to take it apart, clean and lubricate it, if anyone has a similar problem.
Hi Carole, wonderful info re self servicing your older Pfaff machines. I bought a Pfaff 1473 yesterday second hand, brought it home only to find it has several problems, lady I bought it from won’t refund so I’m stuck with it! 1. The presser foot goes up with the lever and doesn’t come down, you have given all the instructions for that, bless you!!!! Plus the light is not coming on so hoping only needs new bulb. 2. She had put new batteries in it before I arrived but it still shows the battery warning message, we found instructions in the manual and tried resetting it before I left her premises. Now I’ve got it home I can see that batteries had corroded in the compartment, so I have given it a clean with iso alcohol on a qtip as well as scrape the corroded terminal, then put batteries back in and pressed the clear memory button and still no luck? Any more suggestions as to what to try? Regards Rosanne
Sent you an email. Try vinegar for scrubbing out the corrosion, and WD40 for the stuck presser bar.
Thank you, thank you, thank you for your very helpful post. I didn’t need to do maintenance on my wife’s machine, but I did need to replace the light bulb. I got it out and ordered a replacement but getting it back in was impossible with my fat old fingers. ; ) I took apart the top and removed the end piece and it was easy peasy! You worked long and hard on this post and I am most appreciative for all your hard work!