
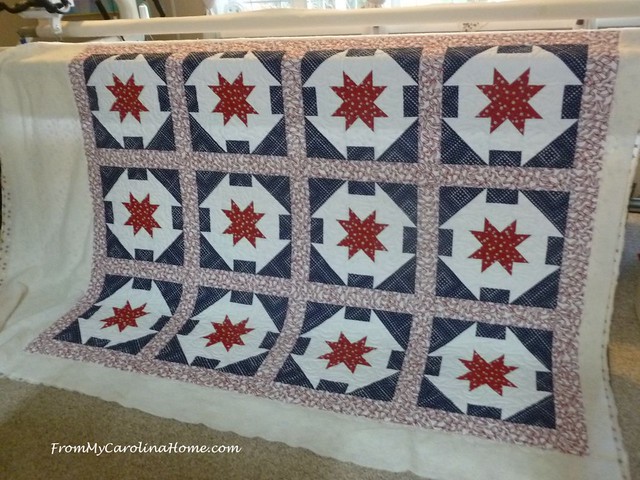
A lovely Quilt of Valor was given to me to quilt, and I finished the work on it over the weekend. The design is simple, basically a churn dash with a star center. For each block, you’d make four flying geese units, then place them with some half square triangles, additional bars, and a solid center square. Then the quilt top was sashed to bring it up to the minimum size for a Quilt of Valor.

The backing was a wide back, my favorite to use, but there was a minor problem. The corners were clipped, presumably to keep it from raveling. I have never found this to be effective. High quality fabric doesn’t ravel if washed with the Brilliant Tip method, and cheap fabrics will ravel no matter what you do.

The problem occurs when pinning the back to the leaders. The clipped point cannot be pinned, and therefore hangs loose.
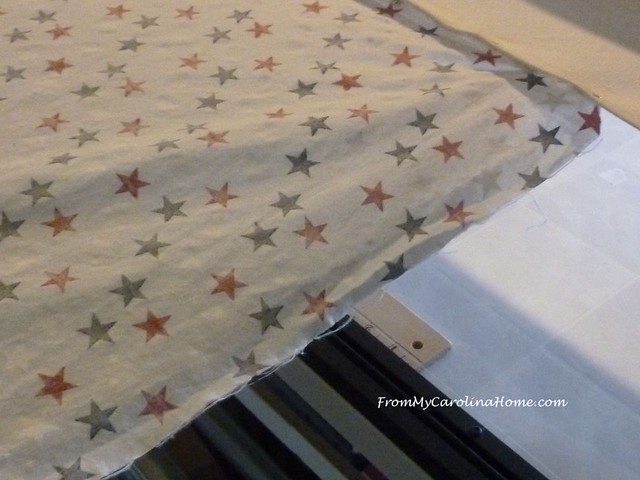
A long view of the pinned backing shows how bad this droop can be. Clamping the sides will help, but this sometimes will produce pleats on the backing.

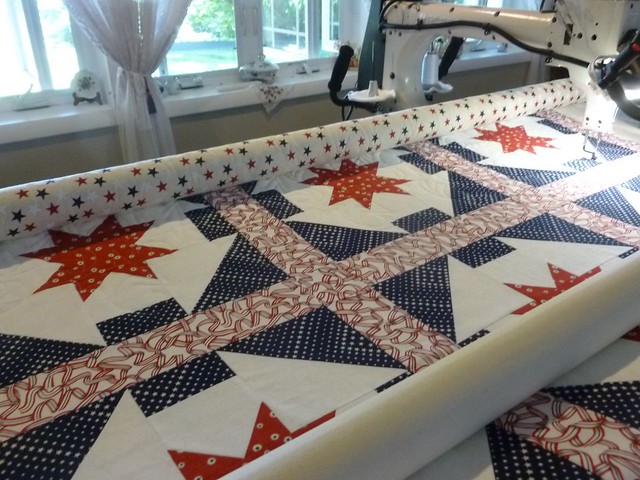
So, I clamped the sides, added the batting and floated the top. Oh dear, can you see how it is bowing up in the middle and down on the edges? This means the borders are too long, and I will have excess fabric to work in all the way around the quilt.

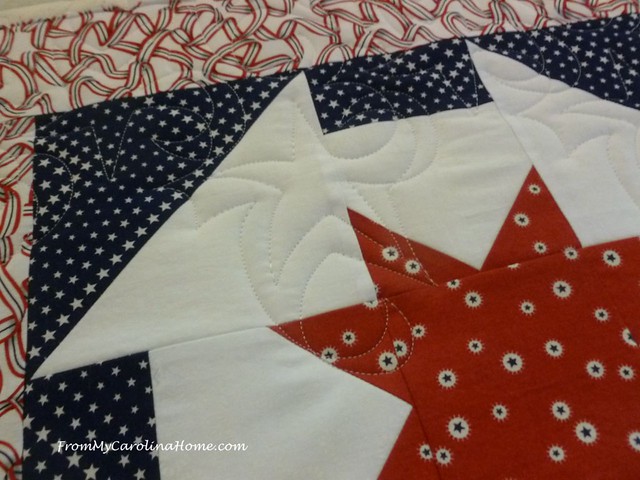
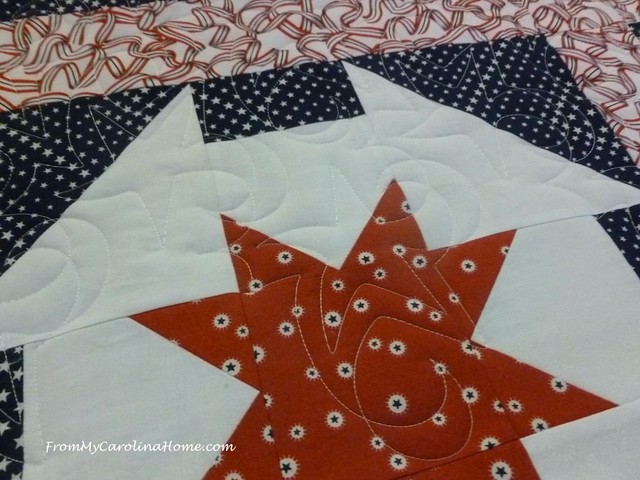
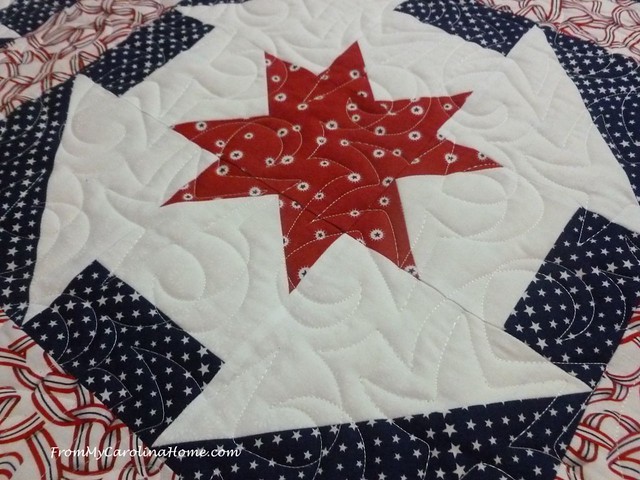
I chose a star pantograph that I recently received called Blue Star from Urban Elementz. I like the star and the flourishes for a patriotic quilt.

It has a big interlocking design, and here you can see how much it goes up and down from the midline. This will make the quilting much less linear when it is all done. It won’t be obvious where the quilting rows are.
Quilting along, the first couple of passes are done. Each advance of the quilt has to be fussed with a bit more because of the backing and border adjustments.
This is what happens when the borders are too long. For a full explanation, see my post on Borders, Understanding the Why. Most of us know how we should do borders, that post explains what happens when we don’t. All this extra fabric has to be worked in as I go.
Here is the other side, a lot of excess.

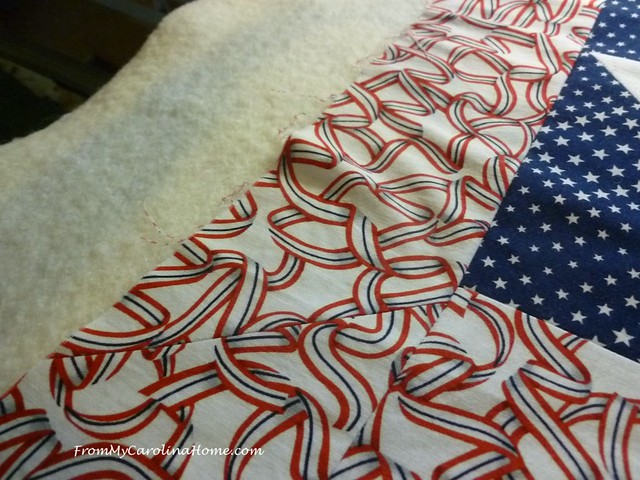
Here is one cause, doing bias seams on the border. The added stretch here is exacerbated when the border is added to the top, especially if they are put on without careful measuring.

I steam and starch the borders as I advance the quilt. I use a solution of Best Press and water, diluting the Best Press 50%. This works just as well as full strength and makes the Best Press last twice as long.

I do both sides. Here you can see how much excess there is.

Spray with the solution, then steam using my iron.

It is amazing how well this works. Look how flat now. Next is to stay stitch the edges, then I can do the next row of quilting.

Working well, and the blocks look great with the star pantograph.
All done in just a few hours spread over a couple of days.

It is quilted in white Glide, with Bottom Line in the bobbin.

The quilting rows tessellate so well, that the overall impression is a nicely dense.
It will go back to the committee this week for trimming and binding.
Are you quilting this week? Or working on a project?

Fabulous! Such generousity by the maker and you!
It Is beautiful! Your extra effort really shows. Quilts of valor is near and dear to my heart!
Kind of scary how problems like the borders shows up on the long-arm. Great fix!!! We had a break in our heatwave, and got some rain, so I have been pulling weeds in the mornings. Getting close to finishing an appliqued dresser scarf or table topper while watching some evening TV. Enjoying our 50 degree weather this morniing!
The star pantograph complements this quilt’s theme and geometry so well! The recipient is sure to be pleased and honored!
Am gearing up to go on a quilt retreat later this week. My anticipation rivals a child waiting for Santa Claus.
Great job on getting it finished. I had a customer who sewed her borders on the bias and finally had to just tell her why they needed to be straight! Her quilts were much easier to quilt after that!! I’m quilting my little project for the Fairy Tales Blog Hop. My day is Friday!!
Great job on quilting out the excess!
A star spangle banner finish with fireworks included!!!!!!!
Oh my! I feel terrible! My friend who made the top is very particular about her own work! I “assumed” knowing her perfectionism, that it would be correct.
Thanks for the lesson on steaming the borders into submission.
PS…I always trim corners before washing, to minimize raveling and to know the fabric has been washed.
Lessons learned. I WILL look forward to binding it! Thank you!! 👏🏻😊🇺🇸
lovely quilt – I like the idea of using the Best Press mixed with water. I don’t use it a lot, as prefer less chemicals, but do like it for making bias stems and circles. This is a clever use to get the borders to lay flat too. Fun quilting designs too, and whoever gets this quilt will be getting a nice quilt.
Thanks for sharing all this good info. I love the prewashing method and will give it a try! I was in NC a few weeks ago for birth of my granddaughter. I waved as I drove by the Mountain Home exit! 😊
Good morning. Oh how lovely. The white stars on the blue background if fantastic and the wavy ribbon is just the right touch of frilly and great as the border , you have a great talent for putting Colors and themes together. That is truly a God given talent. I’m getting anxious to get my kitten squares out of their picnic basket. I have about 6 different baskets I keep my projects In and pull them out when I get into one of my creative highs. Today is my youngest sons birthday, he is 56 and my oldest will be 58 next month. Where has the time gone to, must have been having too much fun huh? Think we will go to the Broadway Dinner and have a reuben sandwich we both love them and I have gotten a lot of reuben recipes to fix different ways, one is as an egg roll, how About that? Some ways has been as a casserole that can be made and then divided up into smaller portions and fixed when the notion hits us and frozen and heated up. Have a fun day, Phyllis
Excellent tips. Thank you. I’ll confess I developed bad habits when I began quilting. I’ll point out that I began quilting before there were rotary cutters, before quilt shops, before quilt magazines and before quilt books (yes, I’m as old as dirt). I didn’t pre-measure borders, nor sashing, but I did hand quilting and didn’t care if there were waves or puckers. Advance forward decades and I learned from a kind long arm quilter about the benefits of measuring blocks, rows, sashing & borders as you are sharing in your excellent tips which I think every quilter should read. Measuring and striving to be precise really makes a difference. And, I am still a lazy quilter who will let bed habits sneak into a quilt and need to be reminded often. So thank you very much for the great reminder and all your wonderful tips.
Don’t you just hate it when someone has been told that hey need to do the sashing with a bias seam. Terrible and a waste of materials. UGH>>> As for the lining I always rip to get closer to straight of grain. Showed a shopkeeper the difference in cutting and ripping, difference was 5″ from one end to the other. sure helps with the dipping in lining, also makes the finished quilt better.
Just wanted to say how beautiful that quilt is. Too bad you don’t have something like this for a giveaway!:)
Keep having fun!
It came out so pretty! You are a magician with these problems. I’m not working on the longarm for a while, sadly, but I do hope to do some sewing after radiation today. Or maybe cutting the blocks for setting with hearts, at least.
You did a beautiful job on that quilt!! And I love that ribbon binding on it!!
What a nice quilt! Thank you very much for the tips you give. You explain beautifully with great pictures. I looked up your link to your “Brilliant Tip” on washing fabric and I will definitely do that! I also learned a lot with your recent repairing of the purple and green quilt.
Have a wonderful day.
Great job and I had to check out your folding technique – brilliant. I have a lot of fabric to wash and hate the mess; I will be putting that tip to use for sure. Love the way you handled the borders and the pressing with a 50% solution of best press – genius.
Although I’d been quilting for a number of years I took a beginner class at a local shop because you got to finish the quilt on a longarm and I wanted to try that. The borders were seamed on the bias, per the instructor, but we did measure them the correct way & fortunately there were no issues. After an earlier post where you mentioned the issue with bias seams on borders, I switched to straight seams. What an ordeal for you between the backing & the borders, your efforts will be appreciated by a deserving service man or woman, it came out beautifully. I just finished completing 3 kiddie quilts for a friend who loves quilts but doesn’t like making them. Tomorrow I’ll start quilting this month’s project for my local guild, a patriotic star wall hanging/table topper that finishes at 42″. Took time out today to pick strawberries & make a batch of jam.
You really steamed that border into submission! I love the pantograph with this quilt, it really adds to the beauty and interest.
I love seeing how your working on doing the quilting. Thank you for the tip on using the Best Press. I love using it but now I’ll start using your idea. Hugs,
This is beautiful. I love seeing your process!
Carole, I enjoyed your border tutorial. I have been quilting for many years and feel I have mastered borders, but always can learn from others. This was the best lesson I’ve seen, I appreciate the time you took to explain this so well. I forwarded this on to my quilt group of 70 members and am getting good feedback.
It’s HOT in the N West! Expecting 100 degree temps for the coming week, unusual for June in the Spokane, WA and Seattle area.
Enjoy your lovely gardens, we are sharing a few plants with the Deer. Don’t plant HOSTAS, although I love them, they are “Deer Candy”
Sue, Deer Park, WA
What a pretty quilt! I tried that clipping corners thing once and didn’t find that it helped at all. I think it’s just another wives tale like the one about using vinegar to stop fabric from bleeding. I keep trying to stop that one but it’s darned persistent!