
Since my block design motivation is taking a hiatus, I got out my dahlia panel in soft pastels, the Hoffman Dream Big Opal that I promised to show you. I want to do this one for me. It will be a practice piece for another one in the Sunset colorway to quilt for a Silent Auction. Is it just as daunting to you to face one of these panels? I’ve done one other, the Leaves panel in a previous post (Fear of Free Motion), and it seemed easier to follow the vein lines already in the printed panel. This one doesn’t have those.

One regret I had from the leaves panel was not doing it in multiple thread colors. I have a variety of cotton threads in lots of colors, so set those out to audition.
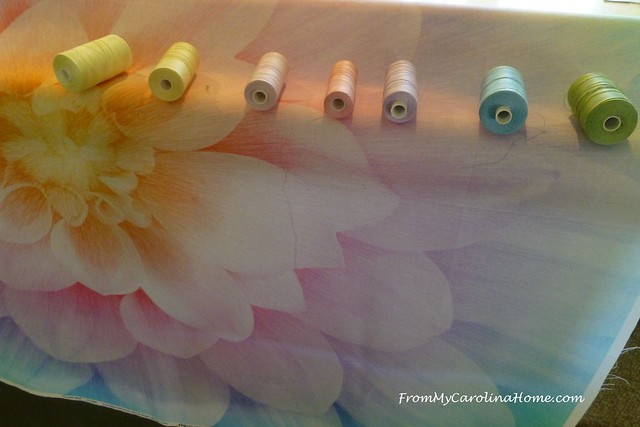
Finding that many color changes to be a bit more than I wanted to do, I narrowed the list to four – yellow, pink, purple and blue. It is loaded with Hobbs 80/20 batting.

Then I spent several sessions over the next few days taking time to simply move the machine with it turned off. I imagined doing feathers, and moved the machine to simulate sewing them. I imagined ribbon candy, and elongated ‘S’ shapes, and some other fills, but quickly ran out of ideas. So I just practiced what I could think of.

It was apparent that I needed a plan. A friend sent me a fill diagram but it was much too complicated for my level of skill. So, I took an image of the panel in greyscale, made a worksheet, and printed it out. I used the sheet to outline the petals first.
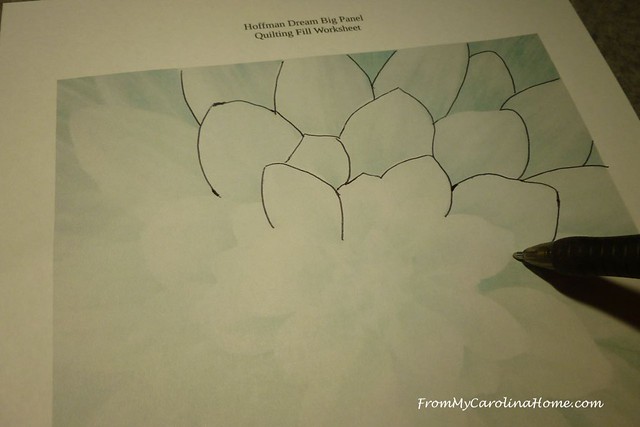
Then I put it in a clear sheet protector to draw fills with a dry erase marker. This didn’t work, as the tip was too big.
So, I made photocopies.

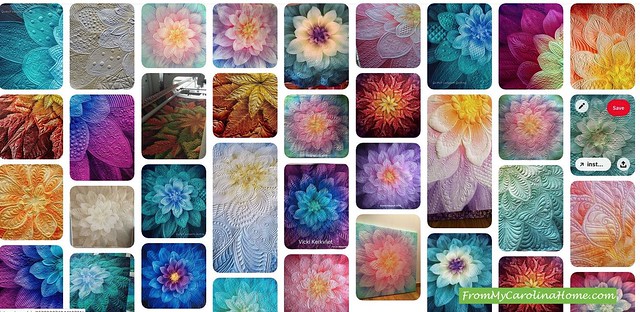
Then I went down a rabbit hole at Pinterest. If you need fill ideas, there are a lot!
Taking a pencil, I began to doodle.
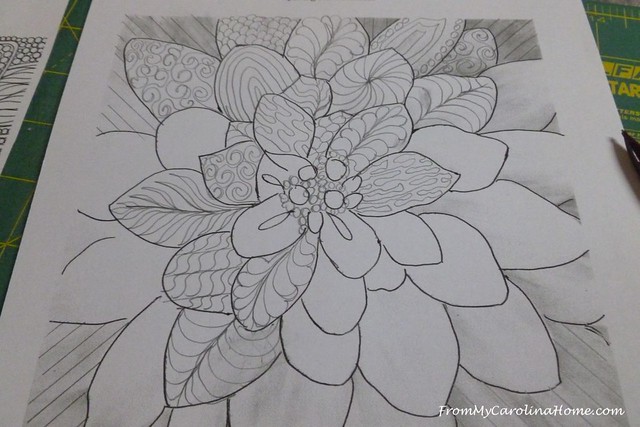
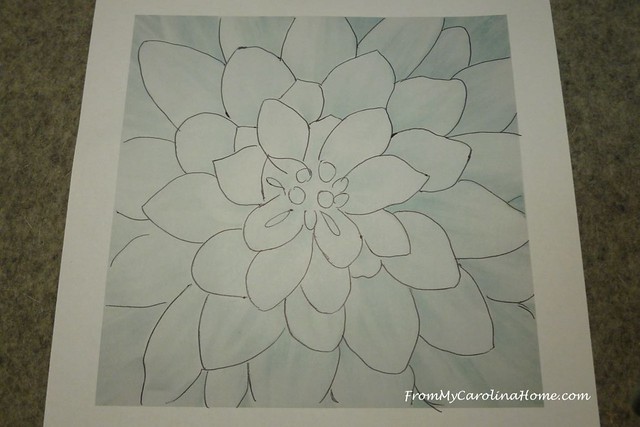
Going back and forth from Pinterest to pencil, eventually I got my plan filled in. It was easier once I realized that not each and every petal had to be different from all the others. There could be two or three with the same fill. I’ve made my worksheet into a pdf download so you can have it to play with – Dream Big Fill Worksheet.

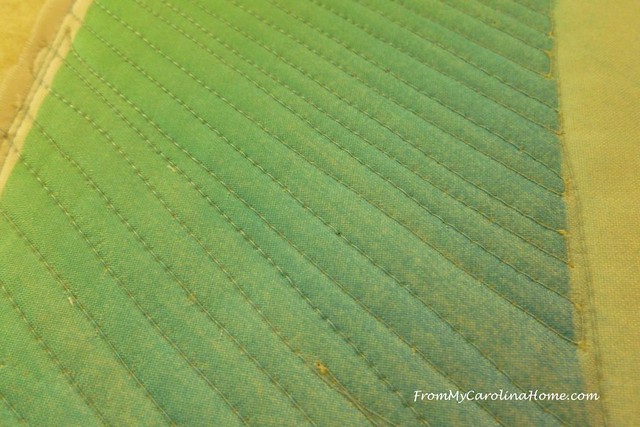
The backing is a yellow print, and I didn’t want all those color changes on the back, so the bobbin is loaded with a pale yellow Bottom Line. The stitches look perfect here.

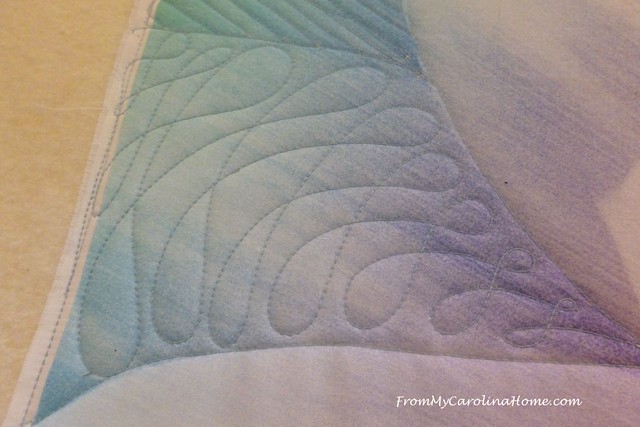
Beginning with the blue, I began by outlining the outermost petals, and filling in the background with lines to simulate rays. Parts went pretty well with the ruler.

The other side got a bit wonky, with the lines not straight in some places. This was due to having to hold the ruler at an awkward angle.
The outer petal on the right side was next, and I had planned rows of ‘S’ shapes for it.

Next I looked at my plan, and found alternating loops on the plan.

Somehow, though, I didn’t do two rows, just one. It wasn’t exactly the shape of the plan either.
I realized that the photo is upside down to the way I loaded the panel. Not really a problem, I just needed to make a couple of changes to the fill plan in the next row. I did a bit more in the blue and then changed colors. The purple petals were started. More on this later, as I work through the designs. It is a lot less daunting when you have a plan! This breaks that huge panel into very manageable bits. All I have to do is look at the next petal, and stitch that fill design.

At this point, I began having some trouble with the stitch quality, and the machine doing funny things. Two days of troubleshooting plus over an hour on the phone with the tech guy, and I have a new bobbin case on the way. With luck that will solve the issues and I’ll be back quilting again soon.

Recently I commented on another blog that a lot of bloggers, including me, are lamenting the loss of our quilting mojo. I think it is the lack of interactions with other quilters in person, the show and tell at meetings, and the quilt shows canceled that are all contributing. We just don’t have the inspiration that we are used to, so online blogs and social networks become our source for motivation. With that in mind, come post what you are working on in our Friends of From My Carolina Home facebook group. And mark your calendar for the Christmas in July Pattern Parade Blog Hop for July 15th. Plan out some sewing time and dig out your Christmas prints, we are going to inspire you!

Congratulations to Georgia Kirby and Sam VanSant who both won copies of the giveaway book from Sunday’s post, Girl Who Chased the Moon by Sarah Addison Allen.
See part 2 of this quilt – Quilting the Dahlia Panel Part 2.
See all the colorways for Hoffman Dream Big panels on Fat Quarter Shop.
What did you sew this week?

Your Dream Big Panel will be stunning with a a variety of stitches. I always take a photo of my quilt tops before I start to quilt them, print the photo and then doodle on the photo. It really helps me to decide on how to quilt the quilt. When I am teaching, I encourage my participants to do the same. Have fun with the remaining sections.
Love all the different stitches in your panel! Before I got back to quilting, I was attracted to ZenTangle drawing and your panel looks a lot like that – tangles inside the petals. Just beautiful! It would make a great sampler too. I have one project doing straight line quilting on an applique lap sized quilt, and starting another applique block. Trying to discover what works best for me. I will post on the FB page! You’re right, we miss sharing our work – and the ups and downs!
I really can’t imagine you being intimidated by this, but I can understand. You are doing great so far. Thanks for sharing all your good thought process. Wouldn’t you know that your bobbin would act up just as you were getting into your panel? I am sorry for you. I know it is frustrating. You are doing a fabulous job.
Very impressive!
it will be so pretty when you are finished. The colors are so relaxing.
It’s so interesting to see this in process on a long arm. I have a Dream panel too & have been contemplating how to quilt it on my domestic. I’ve been looking at a lot of YouTube videos to see how other quilters are designing theirs. Our guild used the panel as a challenge for their show in 2019, what a beautiful display that was with all the variety in the panels & the extraordinary fills chosen. Currently maintaining my sew-jo using virtual show & tell on line & blogs for inspiration.
This is will be stunning when done. It was so interesting to follow your thoughtful process on quilting this. Since I only hand quilt I have never thought in terms of such an intricate design. I have hopped over to the panels and am deciding on Big Sunset or French Blue for a daughter. PS also took a look at the FB page and requested to join 🙂
I’ve seen many of these and they have all looked daunting. I hope the new bobbin case solves your issues and you can get back to work on it. It is going to be gorgeous.
I like your method of breaking down the panel into “manageable” departments! I think you are right about changing the thread colors as you go along. I think you will gain confidence in your free motion stitching as you progress on the project and build muscle memory too. Ruler work is hard. My “one & only” free hand long arm quilt was my Pat Sloan Grandma’s Kitchen. My sister in law had me practice for a full day and we made “example blocks’ on muslin, often times using a sharpie to just draw the block, and then I had fun creating fills. Going down the rabbit hole of Pinterest and looking at fill designs in magazines helped, but there was nothing like threading the machine and trying it for myself on practice piece. Thanks for sharing your process! Going to be beautiful.
Awesome idea, Carole–plan it all out beforehand, then just quilt one petal at a time. And yay for Pinterest!!!
Thank you so much for the fill pdf. That may be just what I need to start on mine (3) Dream Big panels. I did buy a glide thread set from Bold Notion Quilting that matched the Opal panel so I’m really all set—materials, motivation….now I just need some mojo! Have a great day!
Hi Carole! This whole panel scares the heck out of me . . . other than outlining the petals. I love the process you went through to determine your plan. Even if you don’t follow it exactly, no one will know except you. It sure looks nice – can’t wait to see it all finished. ~smile~ Roseanne
Hi Carole
It’s going to be lovely. I’m proud of you for taking it on. These things are a challenge. I did one for a client recently. Not a Dream Big panel, but the same idea. It got pretty scary where there were no definite lines. I was making up imaginary boundaries. Lol.
Carry On. Can’t wait for finished photos
MJ
You have risen to the challenge beautifully. Thank you for taking us through your thought process. I hope the new part fixes your machine problems and you can recover your momentum on this fabulous project.
I am not doing much quilting at all right now. I think I have finally figured out why my machine keeps ‘stopping for safety’ but I just don’t feel like sewing. And, I just had surgery on my dominant hand so my applique project, the only one on which I was working, is on hold for a couple weeks. I hope to have pent up quilting mojo by then. 🙂
Oh, I would definitely have to have doodled and mapped out a plan to be able to quilt something like this. I envy people who can just “wing it” but that is not my style. I am glad you were able to get help troubleshooting your tension issues and I hope the new bobbin case fixes everything for you.
Wow this is quite a challenging piece to quilt-good luck with it all-hugs
I’m with you, having a plan makes all the difference! I just finished my practice piece from Pat Sloan’s June FMQ challenge, and while its pretty ugly, I did it! Now to keep practicing. Your Dream Big is looking splendid already!
My quilting mojo left too, so I have been working away on some smaller projects. I also dug out a piece of linen fabric to make a quick skirt for my daughter.
I am practicing my machine quilting on a couple of panels, changing thread colors and using both walking foot and free motion but nothing as intricate as what you are doing, Carole. Beautiful! Can’t wait to see your finished quilt. It’s a beautiful panel, and I’ve seen it in a couple different color ways. I’m also trying to stay motivated. :o)
I like the planning you do before starting. It will be stunning.
So much fun to watch you do this! You are so brave! I did a panel, a house with flower garden but my panel cost $3.25 so if it went bad, my dogs wouldn’t mind, just practice. (It came out okay but would change the thread color) The next one will be the Dinosaur by Kaufman™. Not too pricey and the boys will love it. I’ll use your idea of planning pages so I don’t go haywire – such a great idea. Thanks!
So pretty. That is going to be one beautiful quilt.
Oh wow! You are so talented!