
Thanks to the very positive response to my idea of doing a teacups quilt along, it is a go! Today we will begin to stretch just a little, come just a small distance out of the comfort zone and learn together. Make as many or as few as you like. Do several all the same block for a table runner, or just one for a teacup mat. If you are doing color challenges or fabric challenges, this would be a way to do two quilt alongs at once!
![]()
Anyway, to help me get started, this being a short week between making the decision to do it and actually doing the first block, I will give you a simple one, paper pieced, just 12 bits and simple construction.

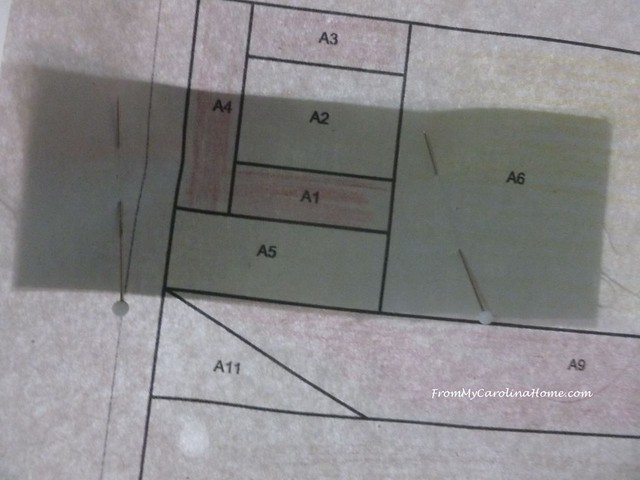
To get the pattern, click to download the pattern in a pdf file – Teacup Quilt Along Block 1. If your printer doesn’t come out at precisely 6-1/2 inches, don’t worry about it. Just go with it as is, as there will be considerable areas to make adjustments later.
Note that the pattern is reversed, as you are sewing on the back of the paper with the wrong side of the fabric up, right side down. Once again, for the foundation paper, you can use lightweight newsprint papers, June Taylor Perfect Foundation Papers, or Carol Doak’s Foundation Papers. You need something lighter weight than regular copy paper, and the translucent papers are easier to work with as you can see the fabrics underneath easier. The best thing about the sheets is they fit in your printer, so you don’t have to trace the patterns. It should measure 6-inches finished, 6-1/2 to the outer cutting lines. Cut the block to the outer lighter line when you have finished sewing.

I highly recommend Aurifil 50 wt thread for paper piecing, as it is very thin and will aid precision with this technique.

Additionally, I’ll be doing several blocks from Cups and Saucers or Cups and Saucers, Updated Edition, (actually the same patterns, just one is updated wording in the first part of the book with the patterns are in color – affiliate links), if you want to do the same ones. Patterns from the book will be our September and October blocks, as I’ll be deep into designing and running this year’s Autumn Jubilee then. If you are a beginner at paper piecing, the see my post Paper Piecing Basics and Tips. One thing to note, I will be using a consistent neutral background so the spaces between the cups will blend together and add to the overall asymmetrical look. I have pulled a 2-yard piece for this from stash, and I hope it will be enough.
I will be using EQ8 and the book for the patterns and not going to other internet sources, as the stock library has everything we need and more. We’ll stretch ourselves a bit with different techniques, coming up with a mixed technique quilt by next year.

OK, so now let’s get started. Pull your theme fabric for the center of the cup. Pull a contrasting darker color from your print for the handle and saucer. Use your neutral background you’ve chosen for the whole quilt. Pick a complementary ‘blender’ print for the table. I have a box to keep the background and leftover bits in, along with the fabric pulls for future blocks so I keep it all together. I did the measuring for you this time, here are the pieces you need to do the block.
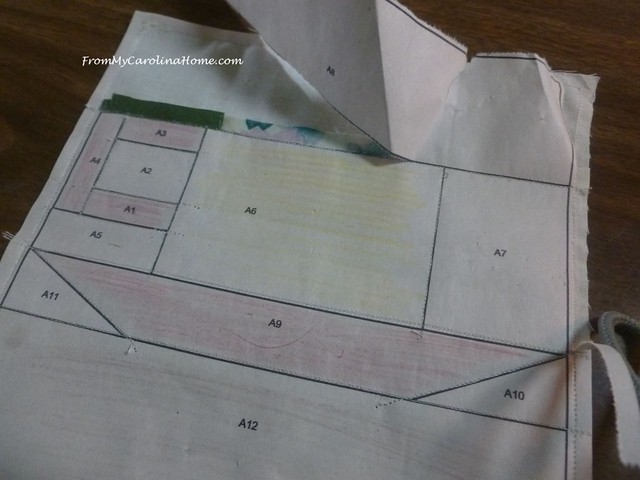
Cup Fussy Cut fabric – one piece 3 x 4 inches – A6
Dark solid handle – total of 2 x 5 inches, cut into three pieces – A1, A3, A4
Dark solid Saucer – 2 x 7 inches – A8
Table Base blender – 2-1/2 x 7 inches – A12
Background 2-inch squares – four total – A2, A5, A10, A11
Background 2-1/2 x 3 inches – A7
Background 2 x 7 inches – A8
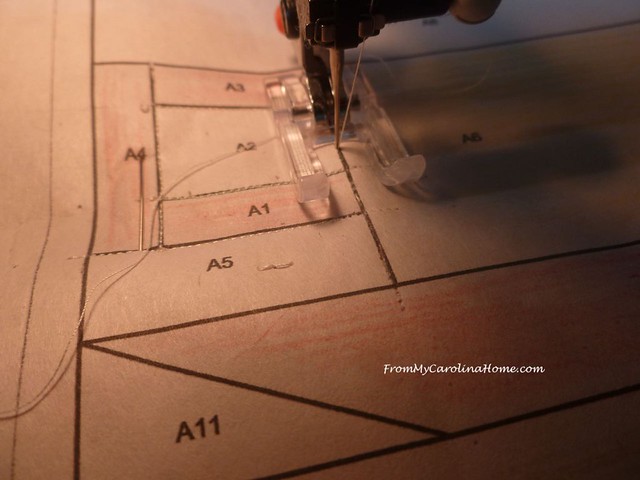
Don’t forget to shorten your stitch length.

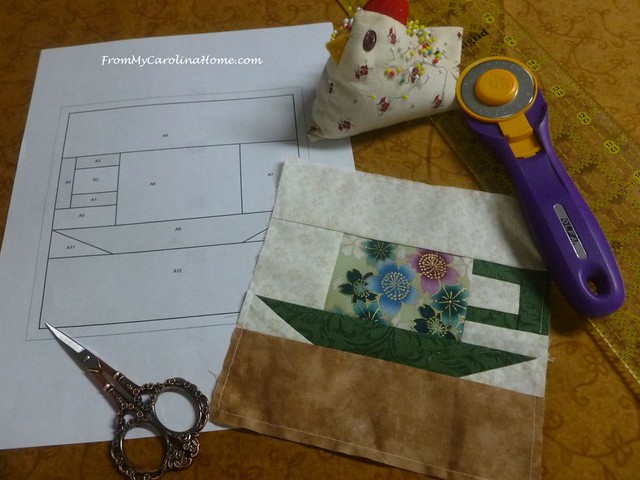
Beginning with the A1 piece, stabilize it on the paper with a few stitches. For detailed instructions, see my post on Paper Piecing Basics and Tips.
Continue working in order, A2 through A12.
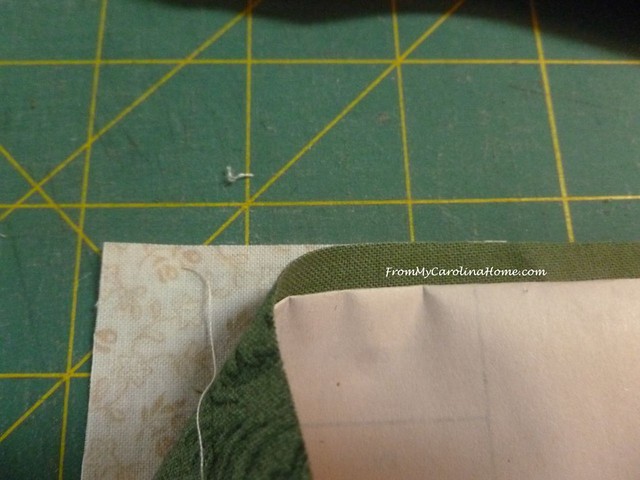
Using an open toe foot makes it easy to see the lines.
Trim on the outer seam line.
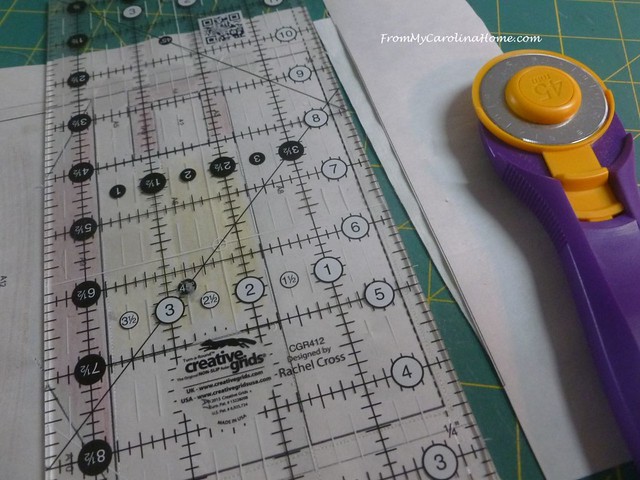
Tear away the paper.
Block 1 Done! Simple right? And maybe not as scary as you thought?
I have created a new sharing group on Flickr so readers can share anything inspired by my blog. Come join if you use Flickr, and share your teacups as we go From My Carolina Home Project Sharing on Flickr , or share in our facebook group – From My Carolina Home Project Sharing on Facebook.
I created a thumbnail logo for you to use on your sidebar if you like. Just right click and save image, then add as a image with this post’s permalink –
![]()
September Block #2 is HERE!
Are you going to quilt along? What will your teacup theme be?
![]()
Sharing
Freemotion by the River

Well now I am curious! They all look like teapots to me – which is the chocolate pot & which is the coffeepot???! I like them all, just didn’t see some discriminating detail I guess!
I don’t need another project but….have you ever read a cup of Christmas tea? I have a bin full of Christmas fabrics. Might just do that. I haven’t paper pieced in a while so thanks for the tutorial.
LOVE A Cup of Christmas Tea! AND If Teacups Could Talk is a sweet read too!
I also find the 1/4” trimming ruler helpful. It has an uneven bottom edge that “ nests” against the paper when you trim off the excess fabric.
Yes, the add-a-quarter rulers are just the best for PP. Love the pattern, but not crazy about the handle for the teacups…might add an appliqued one? Mug rugs with a teacup on the side definitely appeal to me!
Carole:
Question:
When opening the jpeg it shows the whole pattern but when downloading and printing only approximately 2/3 of the pattern, in two pieces, prints or downloads….?
I don’t know, it works fine for me. I’ll see if I can redo it in a pdf.
Good Late Evening Carole; I started on my tea cup right away, after reading your post and followed your tutorial finishing late this afternoon. We had quite a lot of activities taking place here today and even some company. However, I did forget to take any pictures. I will do that tomorrow and share on facebook. I like the way that you have set up the quilt and my favorite block is the beautiful Tall Elegant Brown Tea Pot. Thank you once again, Carole, for taking the time to design such a fun and interesting challenge BOM for us! I am not only delighted but also very appreciative. Have a marvelous day tomorrow.
Love the tea cup block, think I might have to join in!!! Love the idea of a Christmas cup of tea too.
I downloaded the first tea cup and it is a jpg. and when i try to print it the computer thinks it is a photo and doesn’t print it to correct proportions …ie: 6″ or so……? what am i doing wrong?
Working on this, I don’t know why it works for me and not for everyone. I’ll try making a pdf and will email it.
I’m having trouble printing to the correct size as well. Would appreciate receiving the update.
Very Interesting idea. I might not be able to stop myself.
Love this idea. I have some fabric that would go great with this. It is fabric that has cups and different teas on it.
Thank you, Carole, your fix was perfect! 😊
I’m probably sitting this one out because of so many other obligations in August, but I do like the cup you made, and if a few minutes turn up somewhere, I might make one for a mug rug!
Carole, Also having the print problem. It wants to print as a photo and definitely not the correct size although there was no “inch” mark to check but you did give the final size above. Hope you can help Carole. Anne in Colorado
There is a pdf on the post now, just click on the update link.
Hello There!
Thank you for a fabulous tutorial! I was going to use Japanese fabrics as well, until I realized they “belong” to a UFO! LOL! So, I’m cutting into my 30’s prints! I just now finished Block 1 and will be posting later today – I hope! Yea! It’s fun and easy! Thank you!
great tutorial.
Well, as usual, I’m a day late and a dollar short but I love this quilt …. Are the patterns still available? I’m happy to pay.
Thank you … So glad I found you and will be signing up to receive your blog.
The patterns are either free downloads on each post, or from the book referenced in the post. They will remain on the blog. Just click on the Teacups Quilt Along category on the sidebar to see all the posts for the quilt along.