
I have lots of sewing motif fabrics and wanted to do a quilted sewing machine cover for my main machine. I wanted something that looked quilty. So, I designed this one to integrate flying geese, a quilt square and lots of prints.
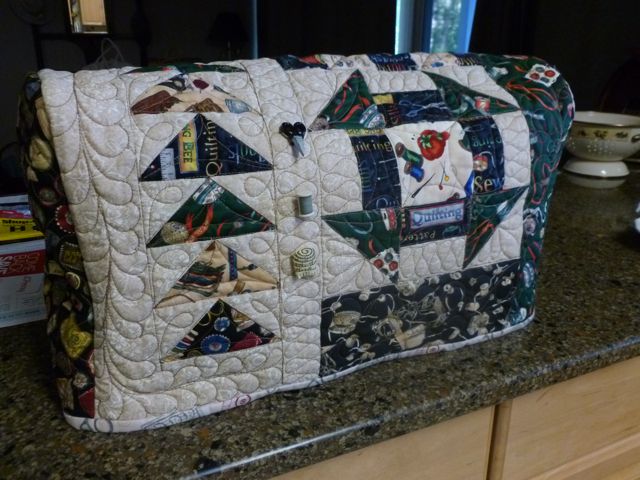


I did a churn dash block 8-1/2 inches finished, (using 3-1/2 inch HSTs and strip blocks, center fussy cut) then added a checkerboard of ten 2-1/2 inch squares set in two rows above it. The remaining pieces are just cut 12-1/2 inches wide and added onto each end so the churn dash block comes out near the top of the front side. I added strips to the sides of the flying geese 1-1/2 inches wide on the right and 2-1/2 on the left. Then I sewed the two strips of pieces together and checked it for fit. I added a strip to the right side as well of a different fabric with a dark green background 3-1/2 inches cut width. The panel is now 18-1/2 inches wide by 27 inches long. I found this was the perfect size to fit all three of my machines, all different manufacturers, so it will probably work for you too. A couple of quick measurements of your machine will show you if you need to make adjustments to the width or length.

Next, cut the side pieces in rectangles 8×12″. Quilt all the pieces separately. I quilted it fairly densely so it would stand on its own when finished. Quilting the pieces at this stage is easy, and simple to do free motion on your DSM or longarm. I used a backing that had a sewing motif with a light background. Then trim all three pieces.


Round off the top 2 corners of the side pieces, on the 8″ end. Leave the bottom corners intact. I choose a darker print for the ends, and rounded them using a dressmaker’s ruler.


Putting right sides together, pin the ends to the long edge of the panel. Notice you will need to ease a bit. I also did a little more trimming at this stage. This is a design choice, you could put the bound seam on the outside if you wanted, using the binding as an accent.


Sew the ends to the panel. Then make binding using the inside liner fabric. Sew to the raw edges on the ends first.


Wrap the binding around the raw edge on the bottom on all four intersection points and pin. I pinned mine down towards the outside.


Then sew the binding to the bottom on the outside, going over the edge seams. You’ll turn it to the inside to finish.

Now, turn it wrong side out and finish up the binding by turning to cover the raw edges and hand whip down the sides and bottom. I added some cute buttons to the front sashing strip in the middle.


This quilted sewing machine cover is #2 on my UFO Challenge list for 2014. Another finish, yea!!

This basic design can be modified to suit your taste. You can change the block, use more or fewer geese, or different embellishments. You could put a second block on the back instead of the fabric rectangles. Or you can copy this one. Just have fun with your fabrics!!
If you make one, I’d love to see it. Just leave a comment with a link to your blog, or your photo sharing page. Thank you!

My blog is a variety of subjects, quilting and sewing, tablescapes and recipes, book reviews and hand stitching, crafting and mountain living. If you are visiting from Fave Quilts, All Free Sewing, Pinterest, a link up site, or just found me, please stay a bit and have a look around, my tutorials are gathered at the top in pages to make them easy to find. Lots of fun is had here, and I invite you to follow with any of your favorite methods, see the sidebar for ways to follow. My mystery quilt along begins in January, see the sidebar for projects in progress. Click on the blog title From My Carolina Home to see the latest posts on the blog.
Using my affiliate links helps me to bring you free patterns and fun giveaways, I may receive a small commission if you use the link and make any purchase. You still use your own existing account if you already have one. Thank you!
Fat Quarter Shop Daily Flash Sale
Amazon Prime Deals!
Shop Amazon – All-New Kindle deals

I need to make a couple of those. I just haven’t taken the time. Yours looks really nice.
It was easy! Didn’t take all that long since the pieces are smaller than a quilt, LOL!! Put it on your UFO list for this year.
I love your quilty themed cover. Beautiful finish. I need to make a really big one or my quilting machine.
Thank you, Jasmine! I appreciate your comment. I hadn’t thought of one for the longarm, so I might have to do that.
Gosh, I need to make a few of these–sewing machine, serger, and quilting machine. Along with everything else on the list!
I’m visiting from the new blog discussion group we joined. Isn’t this fun?!!
Lin
Yes, it is!!
Beautiful machine cover, love the patchwork. I have to make a couple of these , thanks for sharing.
Thanks! I’d love to see yours when you get it done.
My machine is covered with two tea towels. You’ve put me to shame. Your cover is beautiful 🙂
Thank you! But I bet you could have one too very soon, just three panels is all it takes!
Very nice sewing machine cover! I need to make one of those. I am visiting (and started following your blog) from the new blogger’s group 🙂
Thank you! I’ll be looking at your blog too.
Love the fabric line with the sewing notions, what designer is it? Visiting from the new blog discussion
SewingWilde
I have had those fabrics for years. The lining one is “Sew A Needle Pulling Thread” by Cat Williams for South Sea Imports. Some of the others are Hoffman and Woodridge from London. The rest I have no idea, no selvedges remain.
Thanks for visiting!
That’s a nice addition to your sewing machine.
What a fabulous tutorial, Carole. Great pictures and very detailed. I love the addition of those cute sewing themed buttons!
Great job! I love the fabric you used here!
Thanks, Marcia!
Love your pattern and plan on using it for my sewing machine, plus adapting it for my small kitchen appliances. Thank you so very much for sharing your expertise.
I love this. The fabric, the quilting….
I love the simplicity of just three panels. Perfect post to rejuvenate! Thanks for sharing at Tuesday Archives Carole!
Great cover with the perfect fabric. I have hard covers and homemade covers for all of my machines, but they are just about always in use so seldom covered.
What a great cover. I’m needing one, and trying to decide on a pattern. Thanks for sharing.
This is awesome! I’m moving and think this will be one of my first projects for my new sewing space. Thanks for sharing.
I saw this a long time ago. I am ready to make my cover and took quite awhile to find again, but now i have it so am excited to make this. Thank you for sharing. Orchid girl
I love your design! I made this for my new Janome 500e, that has a huge footprint!
I’m not sure how to attach a picture, but I love the way mine turned out!
Just found your post tonight – you’ve done a great job! Congrats!
Pingback: 20 Free DIY Sewing Machine Cover Patterns - SheLoves2Sew.com
Wow! I am just starting to quilt. (My dream has been to continue the work of my Grandmother.) I have been reading A LOT ! I have collected fabrics, organized projects (10, so far), as well as obtaining useful tools. Your presser foot collections were the first of these tools I purchased over a year ago. Getting started has been the challenge. I have confidence with everything except the binding and machine quilting. I just made my way back to your blogs and the tutorials. They are so well documented and have filled in a LOT of the missing pieces and answered questions that I had from reading others. Practicing and experimenting has felt kinda wasteful. Because I am just beginning, I do not have any “scraps” lying around to practice on. This project is exactly what I needed!! I can practice all aspects of making a quilt on a small scale with something that will be useful. And it’s for me, so I do not feel the drive and self-imposed stress to make it “perfect”. Thank you so much!! I am actually ready and looking forward to starting as soon as I submit this comment. You have rocked my quilting world!
I really hope you get to read this. You need to know how helpful you have been!