
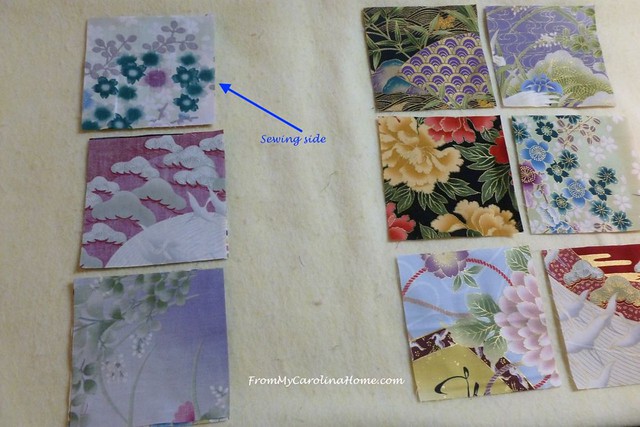
One of the best things about a sewing day or retreat is finding out what someone else knows that you’ve never heard of. Such was the case with a recent sew day, and I want to give Eve Bennett the credit for showing me this truly remarkable and brilliant idea. The original idea for this was developed by Eleanor Burns of Quilt in A Day fame. It is a method of putting blocks together in the final assembly stage of a quilt, and it is light-years faster than my method. So, let’s look at how I usually complete an assembly of a top, and then look at the Web method. I set up a small set of squares that will represent blocks to show you what I mean. Note that all of these prints have a distinct orientation, and it will be obvious if they are rotated or sewn out of place. That will be important later.

When I have all the blocks completed for quilt, I line them up and sew the rows first. Then I join the rows together. So, if I were going to sew this set with my usual method, I would sew the top row first, then put that back on the design wall, and do the next row, continuing as indicated with the rectangles on the photo.

Now, here is Eve’s method. Take the first two COLUMNS and lay the second block over the first so that your edge to stitch is on the right.

Pick them up in order and stack with the topmost set on the top.

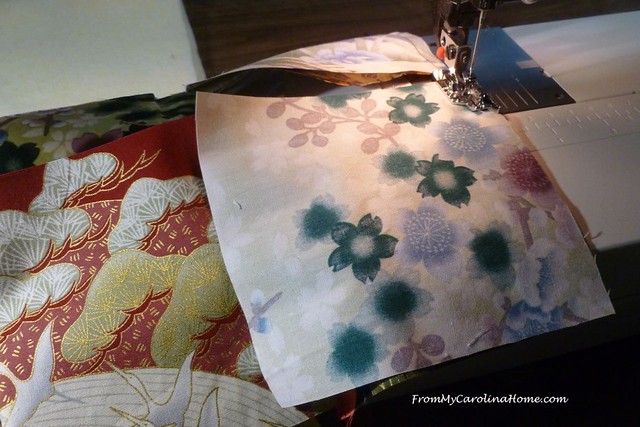
Take them to the machine and chain-sew beginning with the top block. Do not clip the threads. I am using brown thread here so you can see what I am going to show you a bit later.

Now, go to the design wall and stack the next column of blocks with the topmost one on the top and take that to the machine.

Reposition the chain pieced blocks so you again begin the sewing from the block on the first row. Your next blocks will be right side up, and so will your chained blocks. Here, I have already sewn the top one and am ready to chain the next set.

Turn the next block to right side down by flipping it from side to side (just like turning the pages of a book), aligning the left edge of the block’s right side to the right edge of chained blocks.
Chain sew the next set to the first ones. Do not clip the threads.

Continue with the next columns in order, always returning to the first row of the section already sewn, and beginning with the top block on the next stack. Remember to flip from left to right to get the proper side sewn next.

When you are done, you’ll have this matrix of blocks sewn in rows, and connected together with the chain stitches between rows.
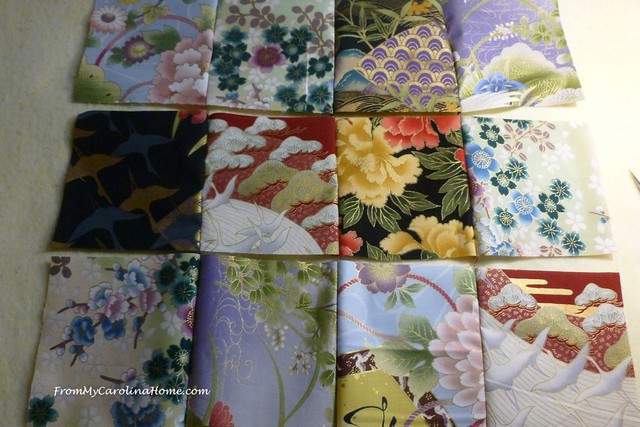
No fussing around with what row goes where, and no laying out over and over to be sure the blocks are oriented correctly.

Take the connected rows to the pressing board, and you can easily see which row to press which direction to make the seams nest. No double and triple checking, no re-pressing for the rows you got backwards.

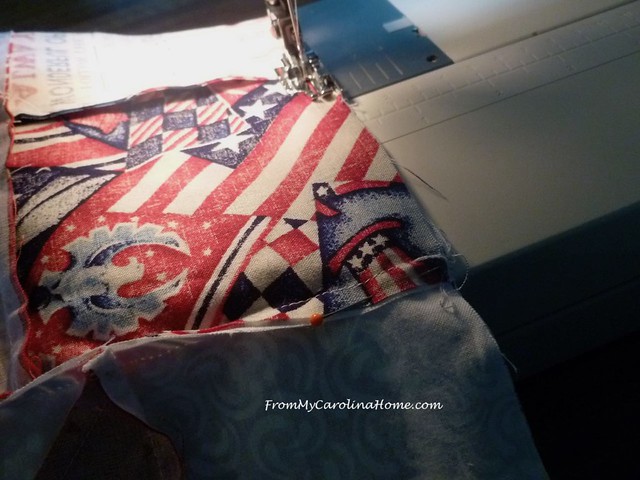
When it is time to do the final row sewing, here is where you really save time. The rows are already connected in order, just fold row #1 over row #2 right sides together, pin the main seams and sew. Then fold row #2 over row #3, pin and sew. You don’t even have to leave your chair as it is already aligned for you. Continue until all the rows are sewn.

Done in a jiffy.

And just so you can check, here are the two photos before and after side by side. Note that the squares are oriented exactly the same way both before and after. I used prints with directions and images so you can see what I mean. If you have blocks where the print placement matters, your placement will come out exactly as you plan.

As an added bonus, if you have to stop before sewing the rows, you can fold up the project and it will be in the same placement plan when you take it out again. I brought this QOV from our sew day home like this.

Without putting it back on a wall, (or in my case, the floor) I can sew these rows in just a few minutes when I get to it.

Simply pinning on the block seams, so very few pins needed. The beauty of the To The Nines pattern is that there are nine patch blocks and 16 patch blocks, so no seam matching within the blocks.
All done, and in less than half an hour!

Isn’t this brilliant? Do you assemble your tops like this, by the row method I used before, or another method?
Pin it!!


What a lovely QOV – I love stars and 9 patches. Well done on your sew day and a great result 🙂
Brilliant! I just love to learn new shortcuts!
I LOVE this assembly idea! Wish I could save it to my Pinterest. Will have to print and thumb tack to my design wall instead
Thanks for sharing
I have not used this method but I can see how helpful it would be! Thank you for sharing this tip.
I have done it your way and your new way, I believe its called webbing. What I like about the new way is that when you iron you can make your seams nest because your ironing them to do so. I can see where this method is particularly helpful with fabric that need to be orientated the correct way. Thanks for the great pictures.
I use that method most of the time. Helps keeps things together with less chance of mistakes.
I’ve done it the “original” way and also the webbing way. When I did my MITTENS quilt with 2″ squares, I worked in 9×9 rows to build “bigger blocks”. It was a big help to keep critical parts together and oriented. When I first saw someone doing it at church, I couldn’t believe how much faster it was! I love group sewing for that very reason.
Hi Carole, I learned this method in an Eleanor Burns class years ago and have used it ever since; especially for quick charity projects. I teach it in my beginning quilting class, too, Thanks for the easy to follow Tute for all the quilters who haven’t tried this yet!
I do mine in a similar way…. but I think this way is a bit quicker. I plan to try it soon. Thanks for sharing. I love learning new things!
Looks like a great method to try. Thanks so much for showing!
I always used this method as I was taught it when I was a very green quilter, now I teach the new ones! Thank you for showing this!
I haven’t seen this before either, thanks for showing it.
I usually sew mine row by row like you. I’ve never seen this method but now that you’ve shown it, I’ll have to give it a try. Thanks for sharing and have a good day!
I do your “old” way, but now it is going to be the “new” way. Thanks for the tip. Love learning new techniques. Quilters are such sharers.
I’ve done it this way for years. I learned it from Eleanor Burns in one of her quilt in a day books about 30 years ago. It especially works good on a tiny block.
These quilts are wonderful. Such a fun way to put them together.
I never quite understood how webbing a quilt worked, and appreciate your step-by-step directions! I’m going to give it a try. Thanks, Carole!
I have enjoyed using this method for awhile now. I learned webbing from Bonnie Hunter and it really does speed up the process, especially if you have to stop in the middle of the process. Your QOV quilt looks great!
I’m new to quilting. This new technique of stitching blocks together is A LOT easier than what the patterns I have used tell me to do. This will be my Go To in the future. Thanks for sharing!!
xx, Carol
I do it that way most of the time. The only suggestion I’d add is to mark the very first block in the upper left corner with a safety pin, so you don’t accidentally get the already-sewn section turned 180 degrees. For a tumbler quilt, rows are still better – sewing the diagonals first.
Thank you for sharing this brilliant idea! I’m going to give it a try 🙂
I do it your original way, except that when I have 2 rows ready to be sewn together, I will sew them together and every time there is a new row to add on, I add it on. I’ve tried webbing and found that I don’t like all that “floppy” off the end/side of what I am sewing…totally a personal preference. I like to sew my quilts from the top down, attaching each row from a different direction so I don’t get any “bend” or “slant” from sewing in the same direction every time I add a row.
Yes…..it saves tons of time & frustration. Have used this method on all my quilts since. Love the way your Valor quilt turned out! Bonnie C. South GA
I haven’t done it this way before but will from now on.
Don’t you wonder why you haven’t thought of this yourself. It’s so simple and straightforward. :))
Hello Carole, I am not sure if I have used this method or not. It seems familiar, but you understand my brain and memory. I will have to save this post and make sure I do try it. Thank you for sharing a fabulous tutorial and technique!
I am predominately a hand piecer, but when I am machine piecing I always web the blocks when sewing them into a top.
Never tried the new way, although Ive heard of it. Thanks for the explanation, must give it a try.
Very clever!!
I have done some blocks like your speed method, so much faster and I have less confusion where rows go as they are already in place. Love your QOV.
It does make a difference in speed and accuracy. If I am just beginning to lay our my blocks, I use a flannel backed tablecloth. The blocks will stick to the flannel, so I=if I need to fold or roll it up out of the way or transport back home from an event, everything stays in place until I can sew.
I use the method you “used” to use…lol. I have noticed on you tube videos people sewing using the second method…it just never dawned on me it could be that much of a time saver. This ole dog will try this new trick. Thank you!
Lea Anne Brummitt of Podunk Pretties (blog and youtube channel) calls it “webbing”. She has a video on it. Your photos, though, are just as descriptive. Well done!
Love your quilt. Thank you for the new method will give it a go.
This is a wonderful tip. Next quilt ai’ll be pulling this out to try! Thanks you!
Good to know! Seeing you use it and describe the benefits makes it visual and hopefully I’ll remember it! Lovely QOV quilt.
Thanks Carole! Genius!! One of those “why didn’t I think of that” processes!
I have known about this method for ages, but never had it explained, so when I tried it, it all went horribly wrong. Thanks for the clear instructions.
I have used this method before and really like how well it works. (As long as there is no tangling!)
Yes, I assemble blocks that way, and put the blocks together that way. I learned it from Eleanor Burns decades ago. She calls it flags. =) You CAN get tangles if you have lots of blocks and rows in both directions. For that reason, in that circumstance, I carefully lay my first two rows down, and pin the next pieces to them on the appropriate sides – just one pin, in wonky, just so I know which two sides go together. After you have three rows sewn together, it doesn’t seem as likely to tangle.
Absolutely brilliant!! Thank you for sharing your new knowledge! I will use this method going forward!
Just tried the speedy assembly technique for the first time with my current QOV project… GAME CHANGER! Thanks for the tutorial!