
Pin Weaving is an older technique that I remember doing many, many years ago. I did a tote bag using this technique in 2016 for the Moda Bake Shop site. I have been showing this tote as part of my Scrap Dancing program, and have had a number of requests to do the tutorial again. So, here it is! The tutorial on the pin weaving technique will be today, and later in the week I’ll do a tutorial on the bag assembly.

You’ll need some supplies to do this, affiliate links provided. First, if you have a cardboard gridded mat, you can use it for the technique with plain fusible web. If you don’t have a gridded cardboard mat, find a big piece of cardboard, and use gridded fusible interfacing. You’ll also need some good sewing pins. I use ones with little balls on the tops. You’ll also use some kind of cording, I use perle cotton. The fabric strips I use are jelly roll strips, but any width strips will do. You can make the pin woven fabric any size you wish, I’ll do 18 x 20 sections for this project. Begin by laying out your cardboard and lay the fusible web with the fusible side up, and the paper still attached. If you are using fusible interfacing, make sure the fusible side is up.

Pin the ends down on each end to hold it in place. Place pins along the edge at two inch intervals on both ends.

Using one skein of perle cotton cord, string the cord around the pins at two inch intervals, going across the area between the rows of pins, creating lines of cording every two inches on top of the fusible web.

Work your way down the entire space at 2-inch intervals. If you like, you can do this at one inch intervals, whatever suits your fancy.

When you reach the end, turn around and come back, putting a second layer over the first.

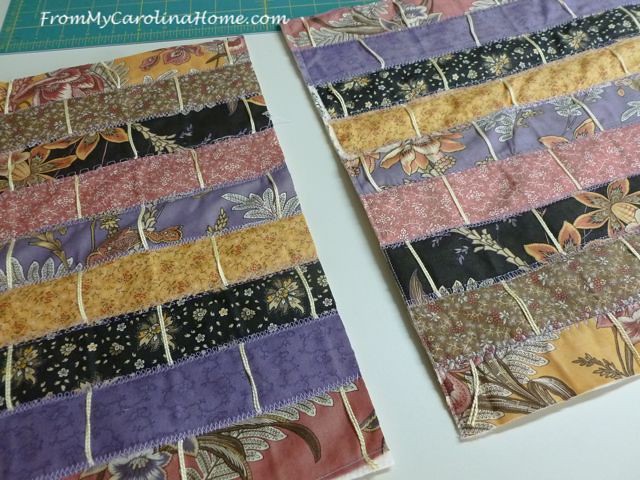
Now, turn your attention to the fabric strips. You can weave these with raw edges, or for a more finished look, iron the edges under 1/4-inch.

Weave nine pressed strips, right side up, through the lines of perle cotton, butting the edges against each other as you go, and alternating the lines over and under like weaving a basket.

Push the first strip close to the pins.

Continue weaving the fabric strips, over and under the cording, like a basket.

Stabilize with pins where needed to be sure the edges are up against each other without gaps.

Press the strips on the mat to activate the fusible web and hold the weaving in place. Work from the strip at one end, pressing (not ironing) each strip so it touches the one next to it, careful to keep the raw edges turned under. A teflon pressing cloth helps here to keep any stray fusible from fusing to your iron.

If you used two sided fusible web, remove the paper from the backside and fuse to a piece of batting. If you used one side fusible interfacing, remove any paper and layer with batting for stitching and pin together.

Using the decorative stitches on your machine, or a variety of utility stitches, or just a simple zigzag, sew the edges of the strips down to the batting.

If you like, you can stitch without batting, just add a layer of lining fabric for your decorative stitches to have more stability, and keep the edges of the strips together.

When the quilting is done, run a line of stitching all around the edge, tacking down the cording.

Stitch down the sides in a straight line.

Trim the cording along the top and bottom.

Trim the edges even.
Now you have some pin woven fabric, next we’ll make a tote with them. Have you ever done this technique?

This looks interesting
I have never seen this. Looking forward to seeing the bag.
I was wondering if the cord gets caught on things when you are using it? I love this idea, but having 2 inch loops on the outside – I would catch it on everything. I hope not because I love it!!
Lois, you could also do a wide/long zigzag stitch over the exposed perle cotton to lower the risk of catching the loop.
I’ve never seen or heard of this, it is fascinating~ I always admire your quilting and sewing skills, I would never have the patience! The end result is lovely and what a detailed tutorial~
Jenna
This looks like fun. A few years ago I participated in a fabric weaving class hosted by my guild. We also used a fusible so I know I have some on hand (& perle cotton) to try this style. I especially like the grid tip.
Good idea and we can always use a new bag……or place mats.
I haven’t but hope to try this. But first I need to go to town for some of the supplies. I live in the country so it will be a couple of days before I go. 🙂
I’ve never heard of this technique either but am excited to try it! I think I’ll gather up some strips and get my “bag fabric” made today! Fun! You are ALWAYS full of fun ideas!
Really beautiful. Such an unique and interesting technique. I love the look.
Very nice description on how to do this technique. I don’t think I have ever seen this technique before. Now I understand how you make this into fabric.
I’ve neither seen or heard of this technique, but don’t think I’d care for the cording being left loose. I think it could catch on things, and possibly damage the bag. It’s a very attractive look, and your tutorial is excellent, as usual Carole.
I heard about this tutorial coming in a prior blog post & was totally interested. After reading this tutorial, I think it’ll be fun. You made this “block” 18×20. So for the upcoming tote bag tutorial I assume I will need 2 blocks? I want to get started as soon as I have some free time. Thanks, can’t wait!
This tutorial is so complete, comprehensive, and the photos show exactly how to do the cording and the strips. I need to find some cord and get some strips organised, and as I really like making bags, this is perfect for a project for a gift later in the year. Thank you SO much for sharing.
What an interesting technique, thanks for sharing it!
I’ve never done this! Your tutorial makes it look a lot simpler than I’m pretty sure it is — keeping things straight, not losing it when you stitch! Yes, I think it could be pretty fussy! But the end game is beautiful. It will be fun to see your tote.