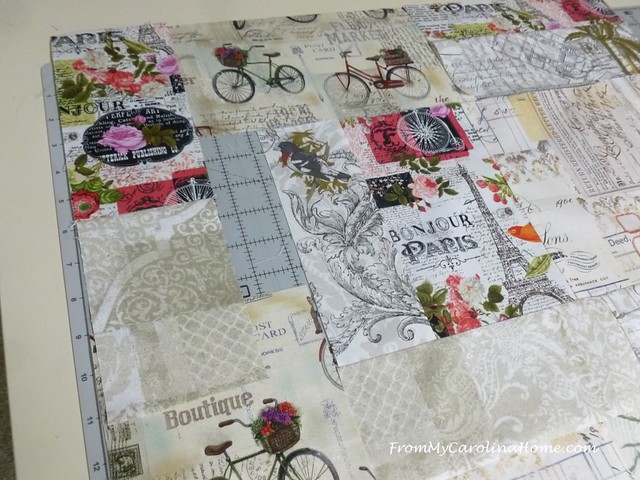
Working on the background of the art piece with a French theme this past week has been a bit challenging. I had set out a number of requirements for myself that made it more difficult. I didn’t want the background piecing to be all uniform sizes of squares. I wanted to spread out the print with the pink to a pleasing distribution over the entire base. I wanted the base to be large enough that the applique would only cover about a third of the space. And the big one, I didn’t want any seam to reach from edge to edge. I’m going to try to give you a sense of how this went together, without showing all the photos I took of the process over the two days it took to get it done. Grab a cuppa and settle in for a long and picture heavy post.

I began by cutting up the print with the pink into various sizes to take advantage of the motifs as best I could. I placed them on my cutting board, spreading them out over the space. The cutting board is about the right size for the base. I cut up the bicycle print and placed two sections on the board, adding additional squares of the other prints to begin filling in the space.

The lower right corner is sewn together. I have added in a small rectangle in the center of the squares so that the vertical seam is not continuous.

Moving to the left lower section, I sewed a section with squares and rectangles. Then, I put a larger square next to the pink rectangle at the top to break the vertical seam on the section below it.

As more and more of the base is constructed, the only way to finish it with my goal of no continuous edge to edge seams is to do a partial seam technique. I don’t want these sections to have a continuous seam horizontally across their top, so I needed to cut down the section on the right to offset it.

I wanted to use this bicycle patch and needed to figure out what do with the pink section below it, as the jelly roll strip was not wide enough.

If I cut off the overage on the bicycle print, I’ll lose part of the wording in the seam allowance.

So, the better idea is to take apart the section at the bottom, and find another print to use.

Laying it on the cutting board tells me the size I need to cut of another print, adding a half-inch for seam allowances.

This print works, and I like the pen nibs motif. So I cut the size and sewed it to the pink rose, then added those sections to the bicycles.

As I near the edges, the need for partial seams becomes unavoidable. This section will have to be done in stages. The pink rose print on the upper left is sewn to the texture below it. Those are overlapping the bicycle print at the bottom, and will need to be trimmed after the next piece is put on. The seams to cover the open space will be done in a clockwise order, beginning on the left side.
A partial seam is marked at the pin in the middle.

The partial seam is sewn, then the unit is added to the one below it.

The top section is folded down, and the inserted piece is trimmed even with the next section. You can see where the partial seam ends for now.

The seam on the right side is sewn from the bottom of the base up to the edge of the inserted piece. The partial seam is still open.

Folding the pink rose section down out of the way, the bicycle print is added to the edge of the floral print.

Then, the pieces are refolded back to line up the partial seam with the bicycle print seam, and the final seam is sewn from where the partial seam left off through to the edge of the base.

I hope that makes sense, because I had to do this several more times. Each time, a partial seam makes it possible to add a cross piece and break a continuous seam in another direction. The seam that runs horizontally here below the bicycle print is sewn first. The partial seam running vertically along the floral strip stops about 3 inches from horizontal seam. This partial seam will allow the horizontal seam on the right side to be completed first, then the vertical seam can be finished.

I arranged more prints on the upper right side of the base, figuring out the best distribution of the prints for balance across the base. The larger section in the center with mostly tone on tone print will largely be covered by the collage rose.

Here, I have a partial seam on the top section to allow the right side to be added before the top seam is finished.

The partial seam on the horizontal seam here allows the addition of the corner patches. I just have to trim the top section to even it out and get the right size for the right section to be added.

Once that is sewn, the last section is trimmed to allow the final partial seam to be sewn to the edge.

After two days of working on it, the base is complete. I think I achieved all the goals. The prints are distributed nicely with different size patches and no seam runs edge to edge.

The size is good for the applique collage. I decided not to add a border to the base.

Loaded on the longarm, it is ready to be quilted. I plan to quilt the base first, then add additional stitching when the applique is added.

I’ll show you more on that next time. For those who are local, Beginnings Quilt Shop has the 18-inch wide Steam A Seam for sale by the yard. This is so much better than the small packages! Stop by and pick up a couple of yards and play collage with me!
******************
Electric Quilt June 29-July 6: Fourth of July Sitewide Sale with Surprise Savings 15-25% off at ElectricQuilt.com. Customers save 15% with code HAPPY4TH. All sales exclude EQ for You Starter Box, EQ classes, and EQ Membership. Get your EQ Books and Fabric Stashes now.
Last Day for Fat Quarter Shop June specials! Take 20% off the Basic of the Month Confetti Cottons by Riley Blake Designs, 30% Off the Notions of the Month from The Gypsy Quilter Notions, and book of the month Flying Geese Multi-Size Quilt Book. Take 30% off featured Patterns of the Month from Fig Tree Quilts! Then, check out Today’s Flash Sale and see the Precuts of the Week!! See the new hand embroidery patterns from Kassidy Rogers for It’s Sew Emma.
Shop the Get Loaded Sale at Sulky.com! Sale ends July 5. And get your Under The Sea Mystery Box, too! Quantities limited, and sell out fast.
Amazon has Oil Pastels for shading on collages, along with coloring on stamped cards.


Good morning! I so enjoy your posts, but this morning I just have to tell you how much I like and appreciate the piece you are working on right now. The rose itself is stunning, but now the background is even more so! Thank you for sharing! Terry Ginter
oh goodness you have tackled the challenge like a pro.
So pretty.
Great description and photographs of your process!
Super beautiful Carole.
Did you make the rose too? This is the best idea! Super pretty
It’s going to be stunning. Thank you for explaining your process.
Thanks for the detailed description of your process. I love this project. The base is perfect for your lovely rose.
Carole, this is absolutely stunning! Can’t wait for the finished product!
This is Beautiful!!!
The base is breathtaking. You have way more patience than I do; something like this would give me a nervous breakdown LOL. Hope you’re staying cool.
Like what you did with the background! The background prints will show off your collage with good contrast.
Glad to see you used partial seams. I use them a lot and they open up a world of possibilities for creative piecing.
Stay safe and comfortable.
Jo Anne
Your background just says ‘Spring in Paris’. I love how you’ve pieced the background which makes the eyes whiz around taking in the whole piece like a story. The appliqué can now add to the story. Lovely piece Carole. I keep going back to admire it! I hope you keep this one for yourself. 🙂
Mary :))
Love the BG choice. Looks great!
Beverly
This is so wonderful — and so complicated! I can’t wait to see the finally finished piece!
I love that mix of backgrounds and then the splash of color on top! it is a great looking piece
Thisis going to be so pretty, Carole! Piecing the background like you did was challenging, but worth it. I love the rose, too! Looking forward to seeing your next steps!
Fantastic background! You’re a good teacher, Carole. The step by step details are priceless. I like using different backgrounds to add depth, but never thought about partial seams. What a game changer that is.
Wow! That’s going to be an amazing piece of art.
Wow it is just gorgeous!! Love seeing your process… xx
This is a great job of creative Tetris! Sometimes it is fun to just put things together and work it out as you go. This is going to be lovely, Carole.