
I have been bitten by the machine embroidery bug, and February is National Embroidery Month. It is a good time to explore more ideas and projects to use this machine capability. Now that I have a good combination of stabilizers, the designs are coming out well. I still have the problem of some thread breakage, and seems to be worse on darker colors. Amazingly, my older Sulky rayon threads do not have as much of a problem with this as the newer Floriani threads. Quality products are hard to find these days. Anyway, on a recent newsletter from one of the online embroidery design companies, I found on an interesting idea. Their design was an ‘in the hoop’ applique that they stitched out and put on a runner with strips of fabric prints between the two appliqued ends. I wanted to use embroidery instead, so I chose a design and stitched out two of the same thing.

I changed a few of the colors to match up with the farmer’s market print I had for the center.

I tape off my ruler when squaring up a design to make it easier to center the design in the size I want. In this case, 8-1/2 inches.

I cut the right side and the top, then flip the piece around to do the other two sides.

In order to make both ends exactly the same, I stacked the embroideries, matching them up precisely by holding them up to a light. Then I trimmed the second one using the top one as a guide.

Now, to audition the fabrics for the middle. I’ll show you the progression of my thoughts, as I’ve had comments that readers like seeing my process. Here I have four prints – the farmer’s market one in the middle, then apples, tomatoes and onions. Cute, but the piece will end up over 40 inches long with borders, a bit too much.

I began piddling around, taking out a print, measuring again, seeing what I think. This is still too long.

Maybe I’ll use the apples instead of the tomatoes and onions.

How about none of the other prints? Nah, I wanted a bit more than this.

Adding the tomato print back hit the sweet spot. It gave me more color, picked up the tomatoes in the farmer’s market print and is a good size at 28 inches long (or thereabouts after the seams are sewn) before borders.

So I sewed those together, then started looking at the border. I only had 1/4 yard of the onion print, not enough for a border. So, the apples would do. The red in that print blended well with the other prints. But this looks too busy.

Adding a strip of white background on the sides to separate the border from the center calms the design.

So, I added both borders.

Loading it on the longarm, I used a backing with black in it.

The runner is quilted with leaves in white thread. I just quilted right over the embroidery.

Two passes and it was done. It took longer to load than it did to quilt.

On the back, the black background fabric has a gold fan print. I added the binding in the same fabric.

Turning that to the front, I finished it by machine.

All done. The black on the binding picks up the black from the center print.
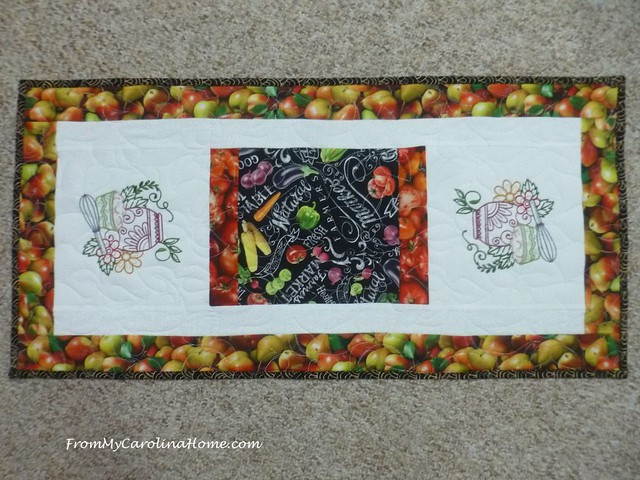
I am happy with how it turned out. The nice thing is that most of the time a centerpiece covers the center of a runner. With this piece, the embroidery will show on the ends.

If you’d like to do this project, the center block and embroidered blocks are 8-1/2-inches square. The tomato print is cut 2-1/2-inches by 8-1/2-inches. The white border on the sides is cut 2-inches x the measured length and added next. Then the apple print border was applied using the measure and cut method with 2-1/2-inch wide strips. The finished size is 15 x 31 inches.
This will go into the quilt show Quilt Shoppe in May. That is unless you want it – $35 plus shipping.
Do you like embroidery on a table runner? Do you think you might make something similar with your embroidery machine?
**********************
Sulky has a 30-40% off sale on Polyester Threads and Stabilizers! It’s a great time to get what you need to embroider some table runners.
Milk Street is having a sale! Get 25% off your entire order when you spend $100 2/9 – 2/11 with the annual Special Sale with code SPEND100.
Check out Amazon’s President’s Day Sales from now until February 19.

Ohh, I’ve been having some fun with my little embroidery machine too! I added some embroidered motifs on the background of the quilt assembled in January. I’m still quilting it, but did the same as you, quilting right over the embroidery. It was an experiment, I wasn’t sure how it would work out – it looks quite nice. You’ve come up with such a nice idea here. Our guild show is coming up & they need items for sale. I should be embarrassed, I’m such a copycat. LOL
The runner looks great, Carole. I no longer own an embroidery machine, yet so enjoy seeing all the embroidery that you do. Thanks for sharing your process, too.
I love the choices that you made and the runner looks great! It’s fun to see your projects! Thanks for sharing with us!
I like your process and it turned out beautiful! I’d like to play more with my embroidery machine but life gets in the way. I’ll enjoy watching your projects.
Those are fun designs, Carole! I really like the tablerunner you ended up with, too – great idea to put the embroidery designs on the outside so they don’t get covered up. Here’s a question that came up in my quilt group yesterday – are embroidery machines separate from regular sewing machines (meaning is embroidery the only thing it does)? None of us have one, so we were curious about how they work!
I really like how the binding frames the runner and coordinates with the center of the runner. I do think it’s really fun to go through the thought process with you on the center elements and prints; thanks for sharing!
Good job !!
It is beautiful. I think $35.00 is very reasonable. You are having some great ideas. Keep it up. Thanks
Carole,
Thank you for sharing your design process and how you put this table runner together. I love making table runners! Most are fast, easy and add a nice decorative touch.
I hadn’t thought about using machine embroidery on a table runner. It is a great idea and I will try it!
Jo Anne
That’s really cute but I have to laugh. Those Farmer’s Market fabrics kind of give me PTSD. My Mom and I bought tons of them and it too FOREVER to use them up! We were totally sick of them by the end.
Thanks! I do like the embroidery – once upon a time I did 24 napkins with winter scenes on the corner. But hand not machine. I would think that with your machine it would wash well and looks very nice! New and traditional at the same time. The quilting pattern accents it well too! Thanks
Great project Carole! I love seeing how you come up with the ideas, and auditioning the fabrics so carefully. Machine embroidery is something I really enjoy and finding ways to use it along with quilting can be a challenge. My embroidery machine projects tend to be little wall hangings or turned into “cushion” covers for the sofa pillows. I have trouble with the Floriani thread I own. I purchased a set of big spools that have really disappointed me. My machines seem to like the threads I purchased on Amazon.
You and Rick’s mom share a passion for the embroidery machine. This is particularly lovely and useful too. I love the colors you chose!
That is a lovely way to use your embroideries. Pretty designs.